This document is a companion for the jDeploy GUI interface. jDeploy allows you to publish your Java desktop app as native bundles for Mac, Windows, and Linux. See the jDeploy homepage for more information.
Requirements
See the requirements section of the jDeploy manual for requirements.
Installation
See the installation section of the jDeploy manual for installation instructions.
Getting Started
Open a command prompt, and navigate to your Java project’s directory.
cd path/to/myprojectLaunch jDeploy by typing "jdeploy" at the command prompt, and press [ENTER]
jdeployIf you haven’t yet created a package.json file for this project, jDeploy will prompt you to create one now.
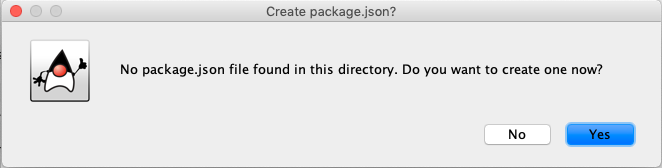
Press Yes
jDeploy will then generate a package.json file for you. It will do its best to set up sensible default settings. For example, it will crawl the current directory to try to find an executable Jar file, and, if found, will select this as the app’s Jar file.
Once the package.json file is generated, jDeploy will open a dialog that allows you to customize the settings for your app and, ultimately, publish it.
The User Interface
The main jDeploy user is separated into five tabs:
- Details
-
Includes most mandatory fields like name, version, jar file, etc..
- Splash Screens
-
Allows you to set splash screen images to be used in the installer and the app.
- Filetypes
-
Allows you to set up file type associations so that users can open certain file extensions and mimetypes in your app.
- URLs
-
Allows you to set up custom URL schemes that will trigger your app to be opened when users click on such URLs in their web browser.
- CLI
-
Allows you to configure how your app can be used from the command-line.
- Runtime Args
-
Allows you to configure runtime arguments, system properties, and JVM options.
The Details Tab
The following screenshot shows the Details tab for a sample "Text Editor" app.

Field Descriptions
- Name
-
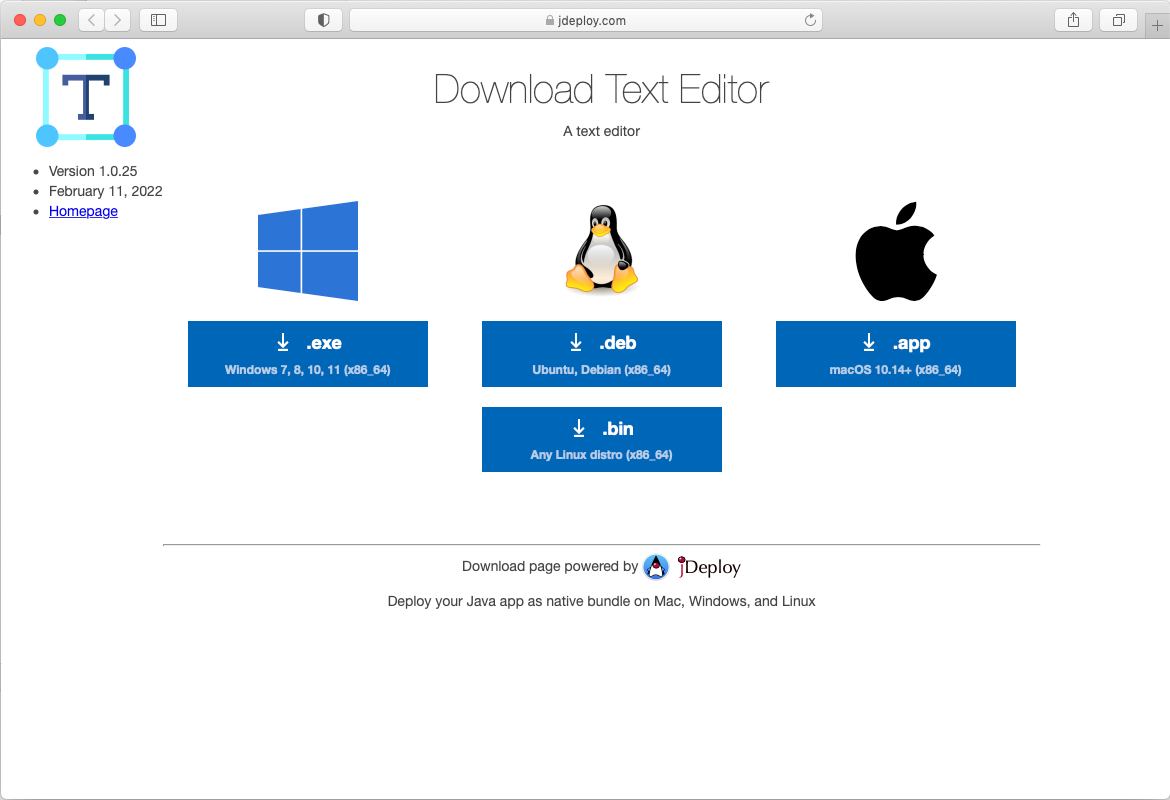
The package name for your app. This is the name that is used to publish your app in npm. It must be unique in npm, otherwise you will get an error when you try to publish your app. This name will also be used in your download page URL. E.g. Your app’s download page will be at https://www.jdeploy.com/~YOUR_PACKAGE_NAME. For the Text Editor app in the above example, its download page is at https://www.jdeploy.com/~jdeploy-demo-texteditor.
The name cannot contain any spaces, and it is recommended to only use lowercase characters and hyphens.
- Version
-
The current version of the app. This is the version that your app will be published under when you press "Publish". Version numbers should be of the form
X.Y.ZwhereXis the major version,Yis the minor version, andZis the build number. You may also mark versions as pre-release by appending-alphaor-alpha.Nfor some numberN. E.g.-alpha.1.Example versions:
1.0.0,2.0.1,1.0.2-alpha.1 - Title
-
The title of your app. This will be used in various places such as the title of your app’s download page, the filename of your app’s install bundle and executable, and possibly other places. It is intended to be human-readable, and may contain spaces, upper and lowercase letters, numbers, and other "not too special" characters.
- Author
-
Your name or company name. You can also provide an email and URL if you enter the author with the following format:
Name <email@example.com> (https://www.example.com). - Description
-
A short description of your app. This will be used on the download page and in various other locations, such as the .deb installer.
- License
-
The license under which your app is distributed. See the package.json specification for details about this value.
- Jar File
-
This should contain the path (relative to the package.json file) to the executable Jar file that launches your app. When jDeploy generated the package.json file initially, it tried to guess which jar file you wish to use. If if chose the wrong one, you can select a different one here by pressing the "Select…" button, and navigating to the jar file.
ImportantThe Jar file must be located inside the same directory as the package.json file, or a subdirectory thereof. If you don’t know how to produce an executable Jar file for your project, see this appendix from the jDeploy manual.
- Runtime Environment
-
The version of Java that is required to run your app. When your app is installed, it will automatically download and install an appropriate java runtime based on the information you enter here. If you check the "Requires JavaFX" box, it will use a Java Runtime with JavaFX. If you check the "Requires Full JDK" box, it will use a JDK (e.g. with development tools), and not just the JRE.
- Homepage
-
The URL to your app’s website. e.g. https://www.example.com/myapp
- Repository
-
The URL to your app’s github repository. If your app is part of a larger repository, the Directory field allows you to specify the directory within your repository where your app’s project can be found.
- Icon
-
In the upper left corner you will find either your app’s Icon, or a button that says "Select Icon…". This will allow you to select the icon for your app. Your app’s icon should be a 512x512 png with transparency, and should be named "icon.png", located in the same directory as your package.json file.
If you click on the icon in the upper left, it will allow you to select an icon for your app. The selected icon will automatically be copied to the correct location in your project.
The Splash Screens Tab
jDeploy allows you to specify two splash screen images:
-
The splash screen that is shown while your app is launching.
-
The splash screen that is shown in the installer window when users are installing your app.
The Splash Screens tab is where you can make changes to these images. The following screenshot was taking from the JavaFX Ensemble 8 demo.
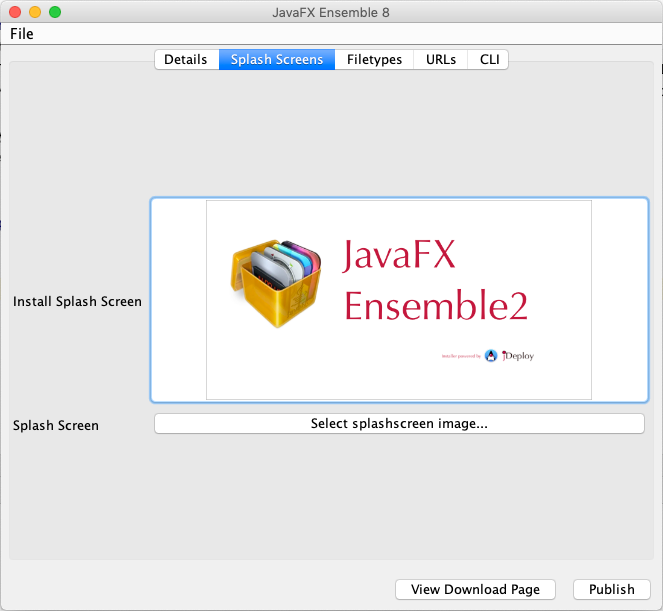
Fields
- Install Splash Screen
-
This image will be used in the installer for your app. It should be a png, but there are no strict requirements on its dimensions. Recommended something in the neighbourhood of 600x400.
The following is a screenshot of the JavaFX Ensemble 8 installer. It is using the splash image to help make it clear what the user is installing
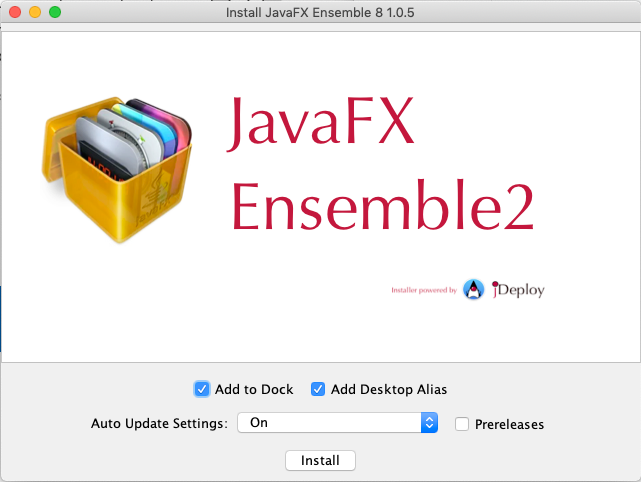
The install splash screen image will be placed inside the same directory as the package.json file, and will be named "installsplash.png". You can select a different image in the UI by clicking on the splash screen image, and using the resulting file selection dialog to select a different image. The selected image will then be copied to the correct location inside your project.
You are not required to supply an install splash image, but it is highly recommended, as it provides a better experience for users who install your app.
- Splash Screen
-
The splash screen is the image that is shown while your app is launching. This can be jpg, png, or gif - and may even be an animated gif. You can select a splash image by pressing the "Select splashscreen image…" button (if no splash screen is already selected), or by pressing on the existing splash screen image. This will display a file dialog where you can select a new splash screen image. The selected image will then be copied to the correct location in your project.
Splash screen images will be stored in the same directory as the package.json file, and will be named "splash.png", "splash.jpg", or "splash.gif", depending on the filetype of the image.
You are not required to supply a splash image, but it is highly recommended, as it provides a better experience for users to give them instant feedback as your app launches.
The Filetypes Tab
The Filetypes tab allows you to associate certain file types (extensions and mimetypes) with your app. This will allow users to launch your app by opening files of these types in their system. It will also allow users to launch your app by dragging files of these types onto your app’s icon.
You can associate both common file types (e.g. text files) and custom file types (e.g. file extensions that you invent to be used only by your app).
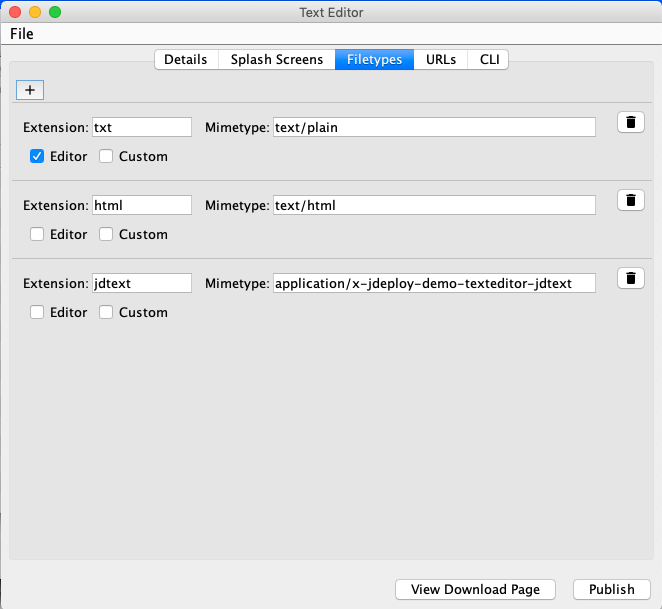
Adding New File Types
Press the  button to add a new file type. Each row, includes the following fields:
- Extension
-
The file extension. E.g. txt, html, mp4. Do not include the "dot".
- Mimetype
-
The corresponding mimetype of the extension. You should provide both the extension and mimetype in each row, as some operating systems rely more heavily on one than the other.
- Editor
-
Check this box if your app can edit files of this type. Leave it unchecked if it can only view files of this type.
- Custom
-
Check this box if this is a custom mimetype. This is used on Linux as an indicator that the installer needs to register the mimetype in the system’s mimetype database.
Detecting When Users Launch Your App with a File
See Accessing files in Java in the jDeploy manual for details on how to detect if the user has launched your app by opening a file.
The URLs Tab
The URLs tab allows you to specify custom URL schemes that can trigger your app to be launched when a user clicks on links of this type in their web browser. This can be very handy if you want to integrate your app with your website. You can then add links in your website that launch your app to specific section.
For example, you if you specify the "myapp" URL scheme, then you could add a link on your website as follows:
<a href="myapp:some-data">Open My App</a>When users who have your app installed click on this link, they will be prompted to launch your app. When you app launches, you’ll be able to detect the specific URL that was clicked, so that you can respond appropriately.
The URLs tab is shown here:
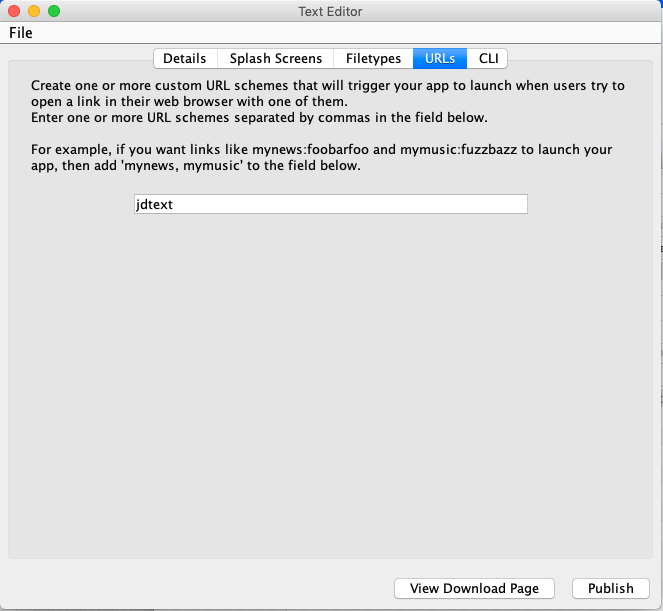
In the above example, the app would be associated with URLs like "jdtext:xxxxxx".
Adding Multiple URL Schemes
To add multiple URL schemes, you can simply add multiple values separated by commas in the text field.
e.g.
"myapp,podcast,feed"
In this case the app would respond to URLs like "myapp:…", "podcast:…", and "feed:…"
Standard URL Schemes
You can associate your app with both custom schemes, and standard schemes. For a list of standard URL schemes that you might want your app to be ableto handle, see this wikipedia entry.
Detecting which URL Launched Your App
See Accessing URLs in Java in the jDeploy manual for details on how to detect if the user has launched your app by clicking a URL.
The CLI Tab
The CLI tab is where you can specify the command-line command name for your app. This is only used if users install your app using npm.
|
Tip
|
Your application can be installed by users as a command-line app, if they have npm installed, and they run Alternatively they could simply enter |
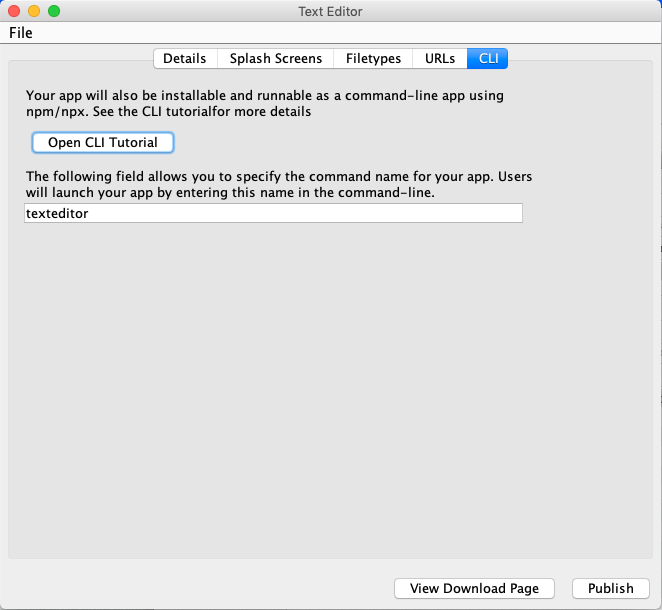
texteditor command, which would be added to their PATH.See the CLI Tutorial for more information about deploying CLI apps with jDeploy.
The Runtime Args Tab
The Runtime Args tab allows you to configure JVM options, system properties, and program arguments for your application. Enter the arguments one per line in the provided text area. jDeploy supports a small set of placeholder variables that you can include in your arguments, that will be replaced at runtime. It also supports a minimal syntax for making platform-specific arguments, which are used on some platforms and not others.
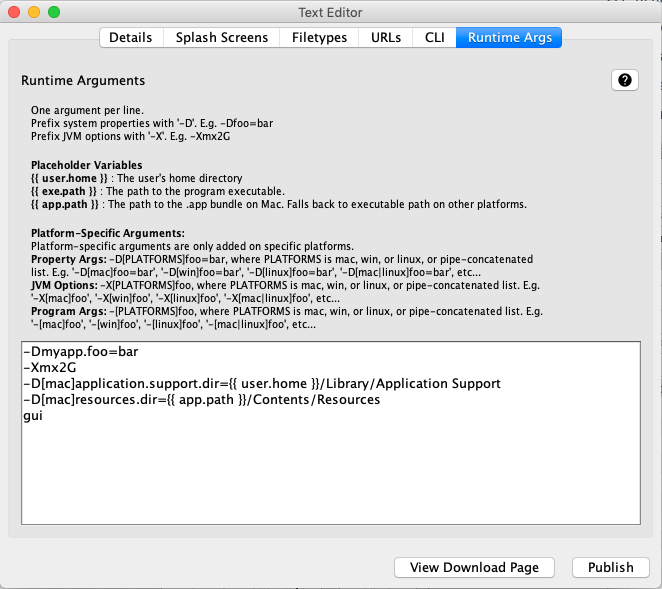
JVM Options
JVM options are options that configure how the JVM works. They are always marked with the "-X" prefix. Some examples of commonly-used JVM options include:
- -XmsXXX
-
Sets the minimum and initial size of the heap. E.g.
-Xms2G. See the Java documentation for more information. - -XmxXXX
-
Sets the maximum sizeof the heap. E.g.
-Xmx4g. See the Java documentation for more information.
System Properties
You can set system properties using the -D prefix. E.g. -Dmyapp.setting=foobar
Program Arguments
Arguments that are not prefixed with -X or -D are treated as program arguments. They will be passed to your program, and you can receive them in your main(String[] args) method.
Placeholder Variables
jDeploy supports a handful of placeholder variables that can be embedded in your run arguments, and will be replaced with the appropriate value at runtime. Placeholder variables are marked with {{ varname }}. The available variables are as follows:
- {{ user.home }}
-
The path to the user’s home directory.
- {{ exe.path }}
-
The path to the executable.
- {{ app.path }}
-
The path to the .app bundle (when run on Mac). Otherwise it will be the same as
{{ exe.path }}.
Platform-Specific Arguments
In some cases you may want a setting to only be applied on a specific platform. For example some JVM options may be mac specific. jDeploy provides a minimal syntax for marking an argument as platform-specific. For system properties, you would add a condition after the -D prefix, so instead of -Dfoo=bar, you would have -D[CONDITION]foo=bar where CONDITION is one or more platform names ("mac", "linux", "win") delimited by pipes. Some examples:
-D[mac]foo=bar-
Same as
-Dfoo=bar, but only on Mac. -D[win]foo=bar-
Same as
-Dfoo=bar, but only on Windows. -D[win|linux]foo=bar-
Same as
-Dfoo=bar, but only on Windows and Linux.
A similar syntax is used for platform-specific JVM options: -X[CONDITION]value, where CONDITION is one or more platform names ("mac", "linux", "win") delimited by pipes. Some examples:
-X[mac]ms2G-
Same as
-Xms2G, but only on Mac. -X[mac|linux]mx4G-
Same as
-Xmx4G, but only on Mac and Linux.
Finally, for program arguments (i.e. arguments that are passed to your main(args) method), you can mark them as platform-specific by adding a -[CONDITION] prefix. E.g. -[mac]anArgOnlyAddedOnMac. Some more examples:
-[mac]foo-
Same as
foo, but only on Mac. -[linux|win]foo-
Same as
foo, but only on Linux and Windows.
The CheerpJ Tab
|
Note
|
This tab is only available when using jDeploy via the IntelliJ Plugin |
The CheerpJ tab allows you to publish your application as a Progressive Web App using CheerpJ.
From the CheerpJ website:
CheerpJ is a WebAssembly-based Java Virtual Machine for the browser. It has extensive compatibility with Java 8 and provides a full runtime environment1 for running Java applications, applets, libraries, and Java Web Start / JNLP applications in the browser without plugins.
This is currently experimental. Limitations include:
-
Only Swing/AWT UIs are supported currently. No JavaFX.
-
Some 3rd-party java libraries may not be supported. You can try to build and find out.
|
Important
|
Please read the CheerpJ licensing options before deploying your application, to ensure that you are fully compliant. |
Setting up GitHub Pages
This feature will publish your application to GitHub pages, so you will need to enable GitHub pages your GitHub repository.
But before enabling GitHub pages, create a branch named "gh-pages" in your repository.
Then, navigate to the "Settings" section of your GitHub repository, and select "Pages" from the left navigation menu:
Under the "Branch" section, you should see something like the following:

Click on the "None" drop-down menu, and select the "gh-pages" branch.
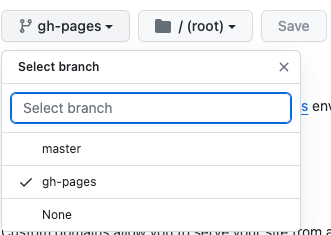
Then press "Save"
Leave the "folder" set to "/root"
Activating & Configuring CheerpJ
Now, back in the "CheerpJ" tab of the jDeploy Settings, check the box that says "Enable Web App Generation using CheerpJ"

After checking this box, you should see some default values entered into the "GitHub Pages Branch", "GitHub Pages Branch Path", and "GitHub Pages Tag" path fields.
| Field | Description |
|---|---|
GitHub Pages Branch |
The name of the branch that GitHub pages is configured to publish from. This needs to match the GitHub pages settings on GitHub. It is recommended to leave this as "gh-pages". |
GitHub Pages Tag Path |
The sub-path within your GitHub pages host where "tag" releases should be published. E.g. If you enter "latest" here, then whenever you create a new "tag" in your repository, it will publish your web application to the "latest" sub-directory of your GitHub pages site. If you want the path to include the "tag", you can use the |
GitHub Pages Branch Path |
The sub-path within your GitHub pages host where "branch" releases should be published. You can use the placeholder For example, if you enter |
If you have everything configured correctly, then your app will deployed by GitHub actions on every commit and tag.
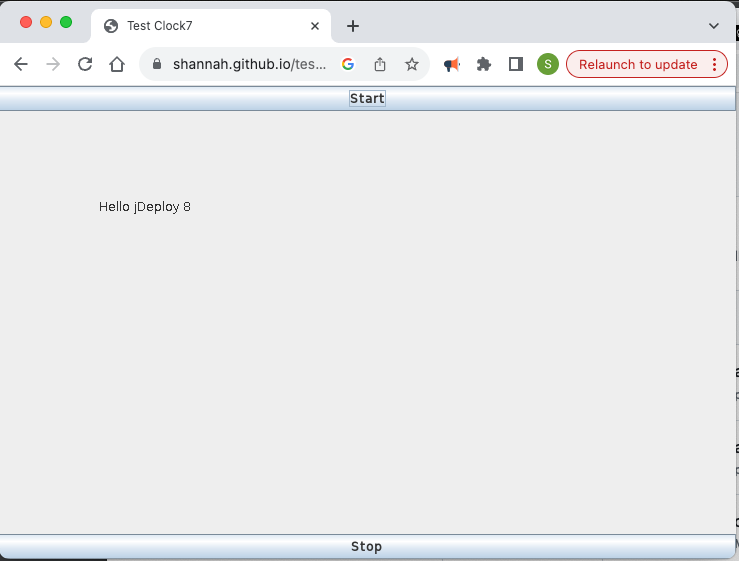
The following is a screenshot of the default Swing project template running as a Progressive Web App in Chrome.
For more information about CheerpJ, see their website.
|
Important
|
Please read the CheerpJ license to ensure that you are complying with their requirements and limitations before publishing your application. |
Publishing Your App
|
Note
|
This section only applies to projects that use npm for deployment. If you are using GitHub releases for deployment, then publishing is handled by GitHub Actions. |
|
Note
|
This section is not applicable when using jDeploy via the IntelliJ IDEA plugin. |
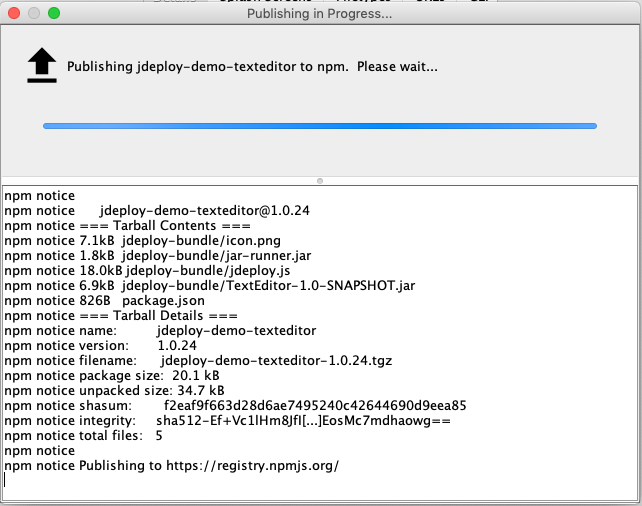
After you have finished configuring your application’s settings, and you’re prepared to publish your app, you should press the "Publish" button in the lower-right corner.

This will perform a few sanity checks on your app’s data to make sure that everything looks kosher. It will then, attempt to publish your app to npm.
If you haven’t yet logged into npm on the command-line, you will be prompted to log in.
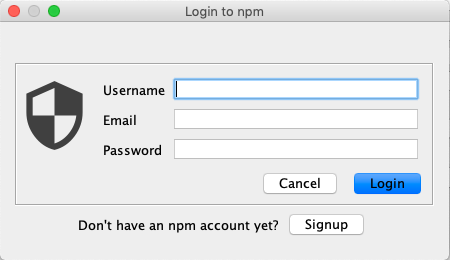
You should use the username, email, and password for your account on the npm website.
|
Tip
|
You can, alternatively choose to login on the command-line in any terminal window before publishing your app, using the npm login command.
|
If all goes well here, npm will send a "one-time password" to your email address, which you can copy and paste into the ensuing prompt.
Then the publish should begin.
Depending on the size of your bundle and your internet connection speed, this may take anywhere from 5 seconds to 5 minutes - but probably closer to 5 seconds.
If all goes well, you see a Success dialog, and will be prompted to view your app’s download page, where you can download native bundles for Linux, Mac, and Windows.
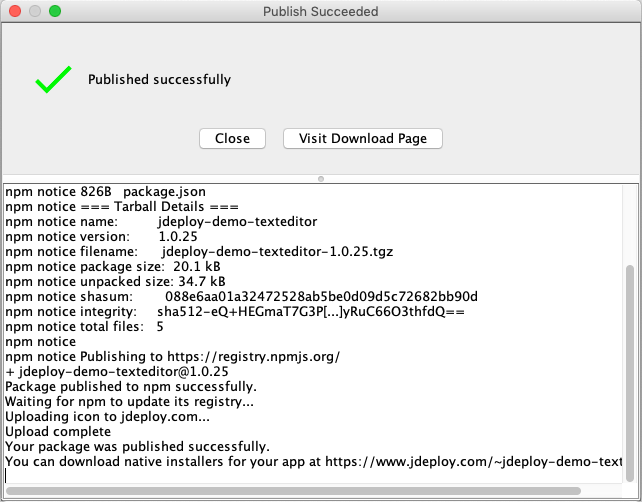
You can press the "Visit Download Page" button to open your web browser to your application’s download page.