Overview
jDeploy 6.0 is a major release. It ships with a built-in MCP server so that AI coding agents can create, configure, and publish jDeploy projects directly. It transforms jDeploy from a GUI desktop application bundler into a full multi-modal application platform — a single package.json can now declare and install GUI apps, CLI commands, background services, a system tray helper, self-updating commands, CLI-to-GUI launchers, and MCP servers for AI tool integration. And the desktop GUI has been completely redesigned with side navigation to accommodate the growing feature set.
All new features are opt-in. Existing packages continue to work exactly as before with no configuration changes required.
Built-in MCP Server for AI Coding Agents
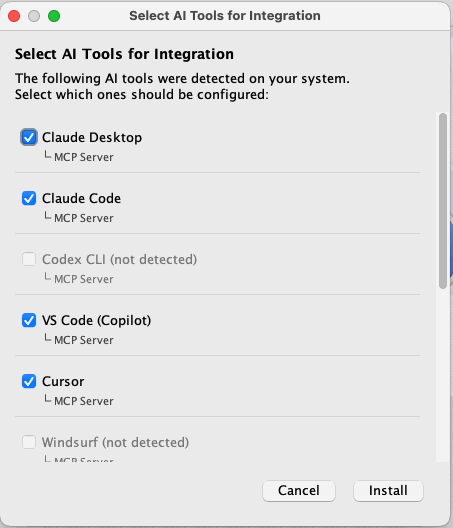
jDeploy 6.0 ships with its own MCP server, making jDeploy itself a tool that AI coding agents can use directly. When you install jDeploy, the installer detects which AI tools you have installed (Claude Desktop, Claude Code, VS Code Copilot, Cursor, Codex CLI, Windsurf, Gemini CLI, and others) and lets you choose which ones to integrate with.

Once connected, your AI coding agent can:
-
Create new jDeploy projects from scratch, including generating the
package.jsonconfiguration and GitHub Actions workflow -
Set up distribution on existing projects — configure build settings, CLI commands, services, MCP servers, permissions, and download page options
-
Publish projects — build and publish releases to npm or GitHub directly from the agent
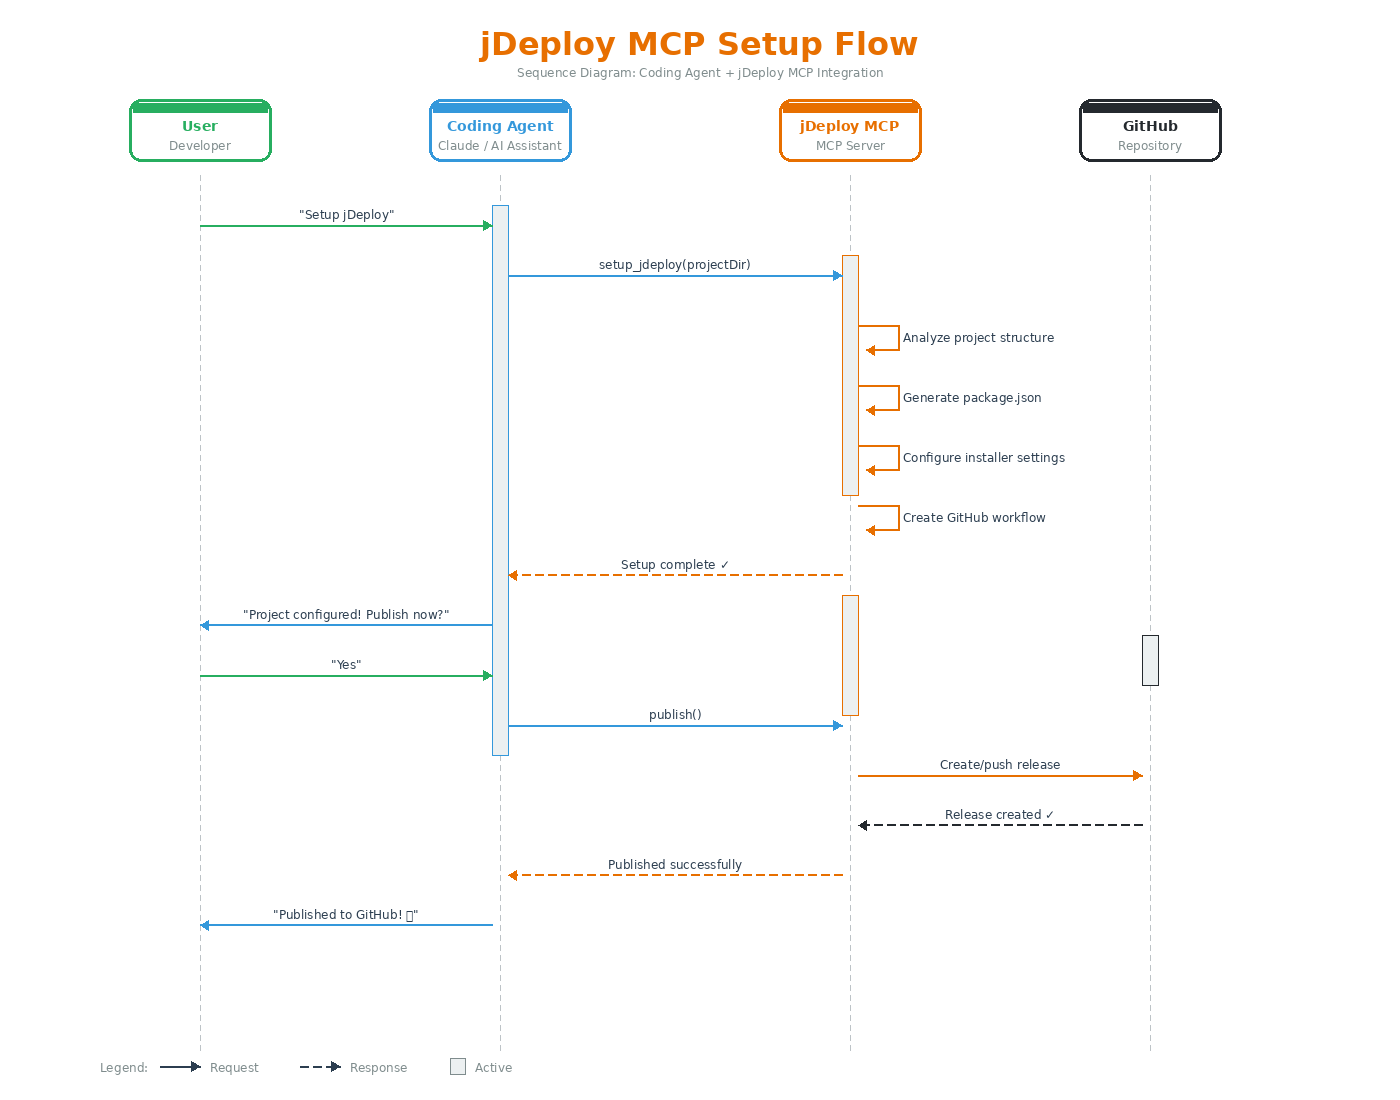
This means you can go from an existing Java project to a fully configured, cross-platform distributed application by describing what you want to your coding agent. For example, in Claude Code you can say:
Set up jDeploy for this project with a CLI command and a background service
And the agent will analyze your project, configure the appropriate package.json settings, set up the GitHub Actions workflow, and guide you through publishing — all without leaving your editor.
This is distinct from the ability to deploy your own app as an MCP server (described in MCP Server and AI Tool Integration). Here, jDeploy itself is the MCP server, and your AI tools are its clients.
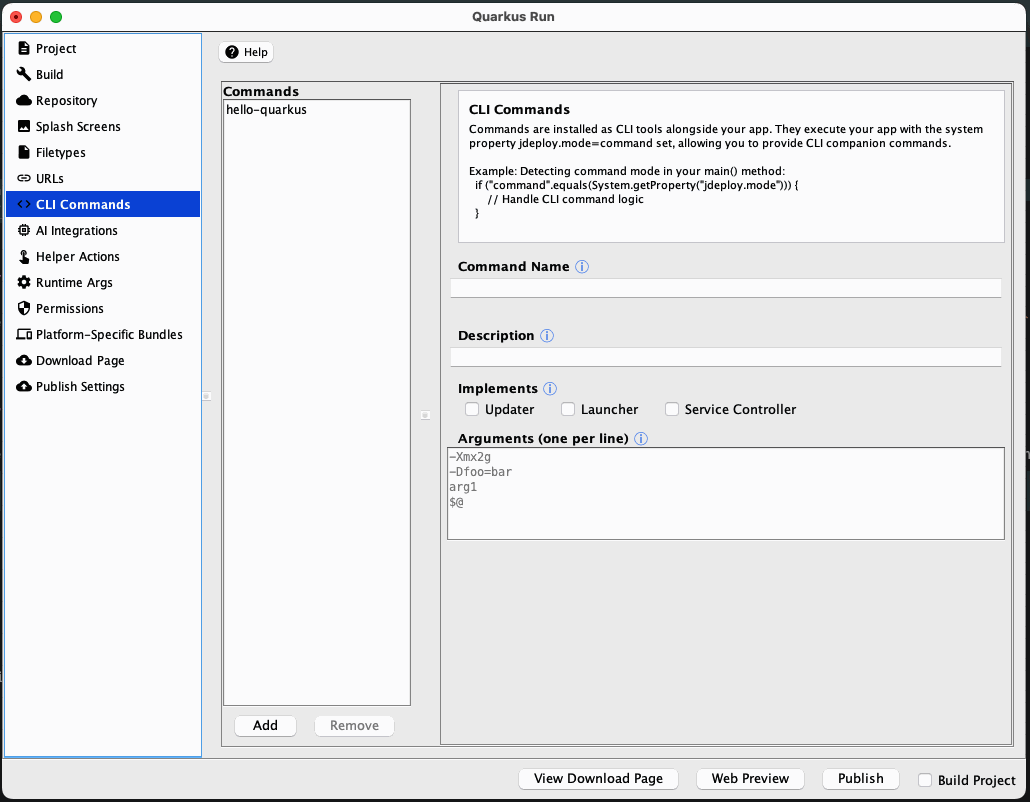
Redesigned Desktop GUI
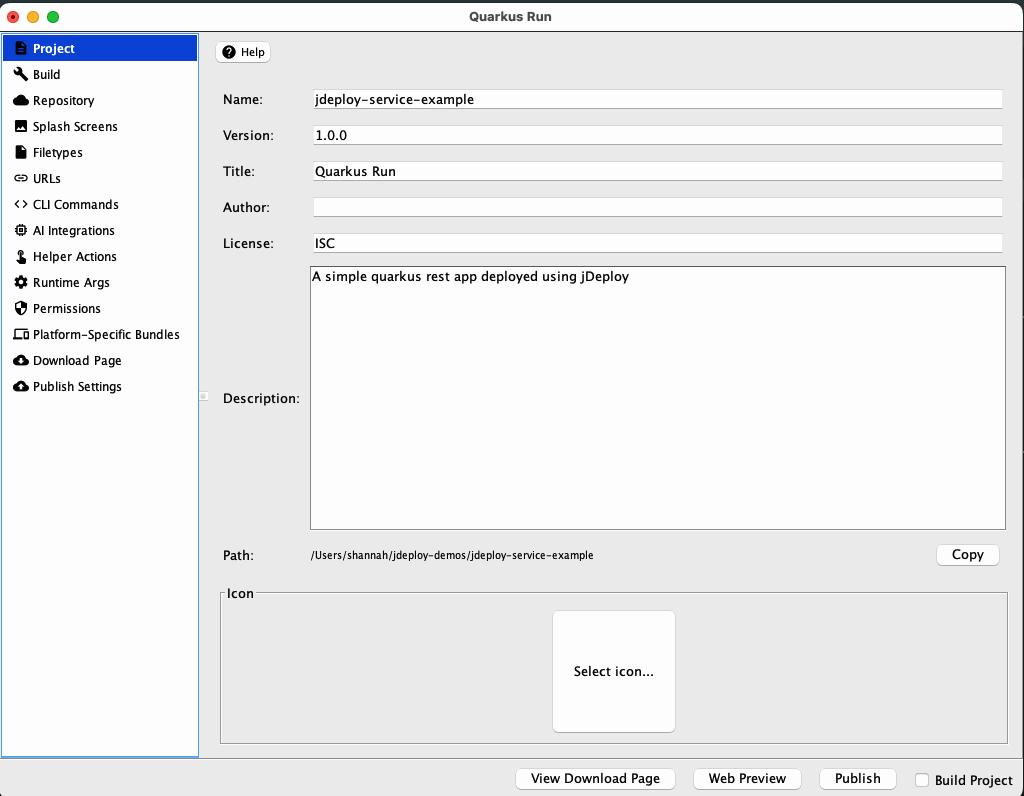
The jDeploy desktop application has been completely redesigned for 6.0. The previous tabbed interface across the top has been replaced with a side navigation panel, similar to IntelliJ IDEA and VS Code. This provides room for the growing number of configuration sections without crowding the UI.
The side panel organizes settings into dedicated sections:
-
Project — Name, version, title, description, and icon
-
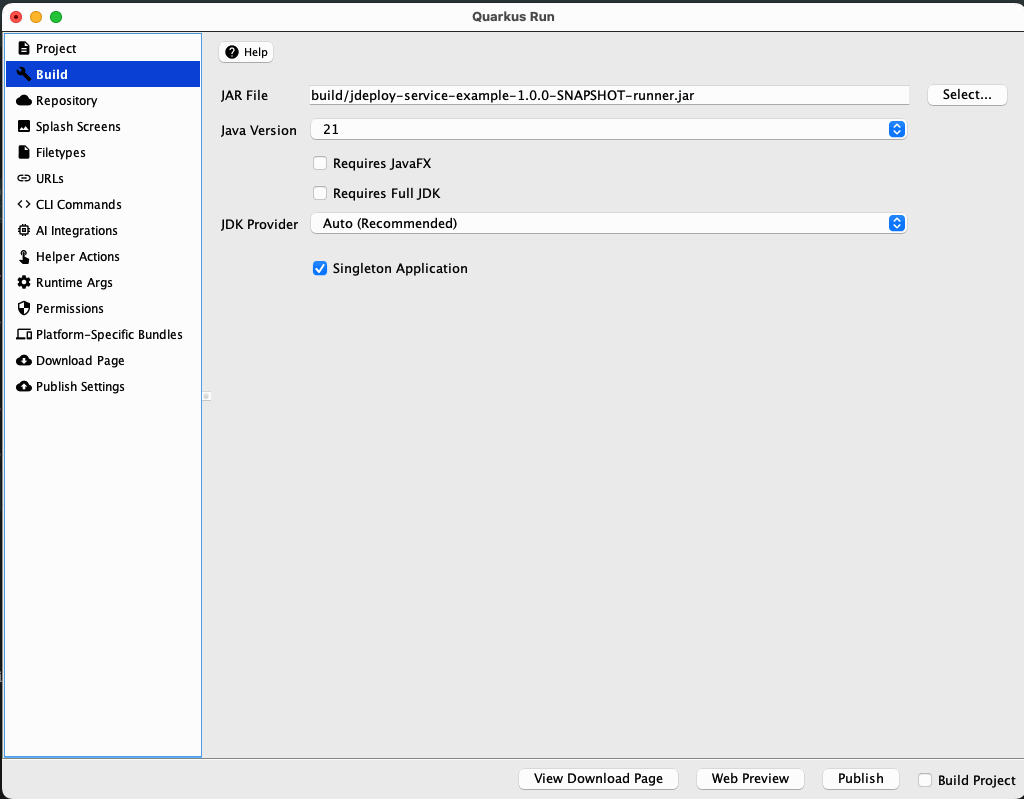
Build — JAR file, Java version, JDK provider, and singleton mode
-
Repository — Homepage and repository URLs
-
Splash Screens — Install and launch splash screen images
-
Filetypes — File type associations and directory handling
-
URLs — Custom URL scheme registration
-
CLI Commands — Define CLI tools installed alongside your app
-
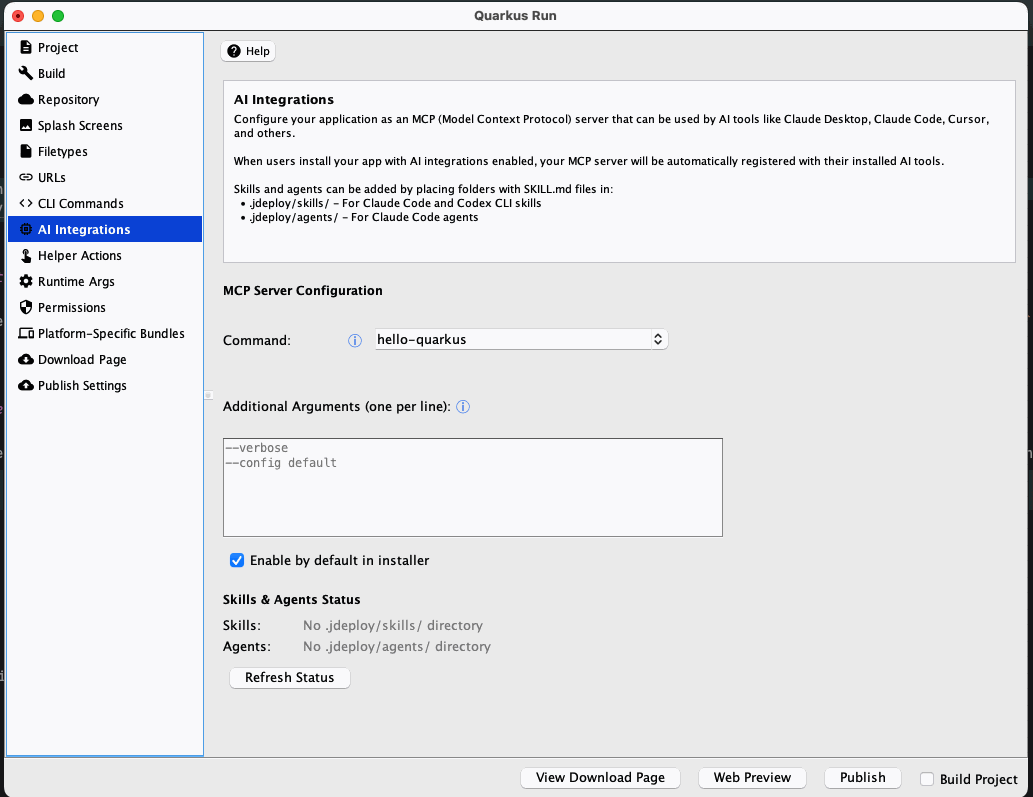
AI Integrations — MCP server configuration and skills/agents status
-
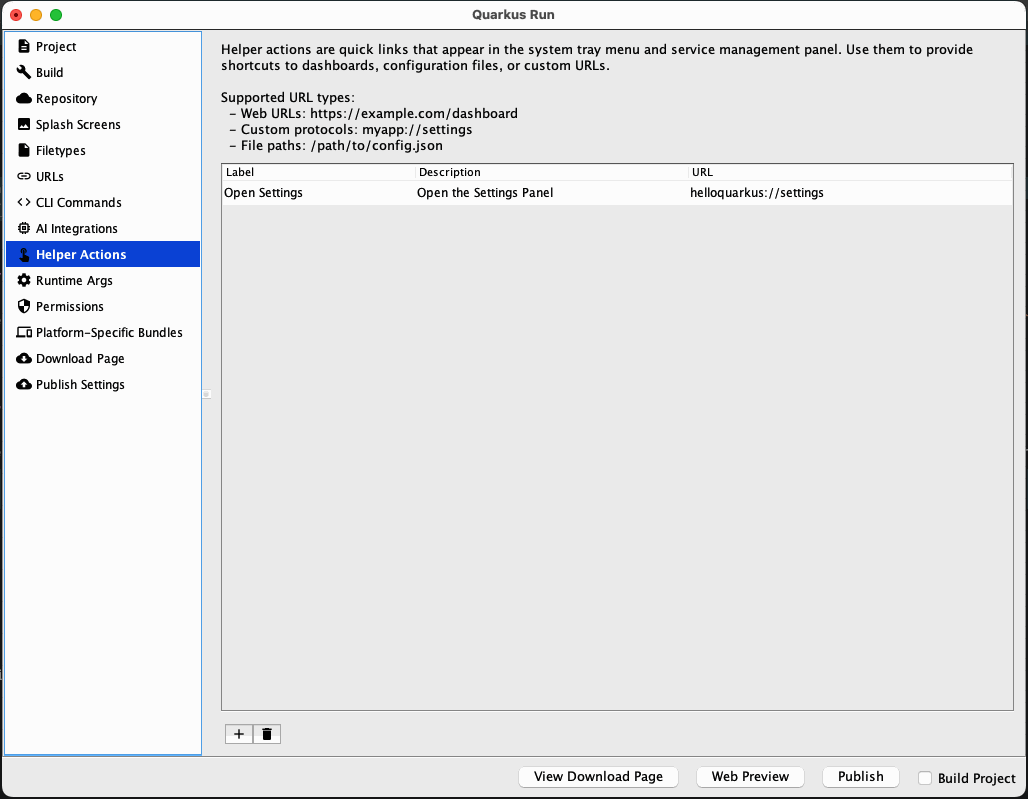
Helper Actions — System tray quick links and shortcuts
-
Runtime Args — JVM arguments, system properties, and platform-specific flags
-
Permissions — System permissions (camera, microphone, location, etc.)
-
Platform-Specific Bundles — Per-platform native library inclusion rules
-
Download Page — Platform selection for your download page
-
Publish Settings — npm and GitHub release targets
Several of these sections are new in 6.0 (CLI Commands, AI Integrations, Helper Actions) and correspond directly to the multi-modal features described below.
Improved Installer
The installer has also been updated for 6.0. When an app is already installed, the installer now shows Update and Uninstall buttons instead of just "Install", making it clear what action will be taken.
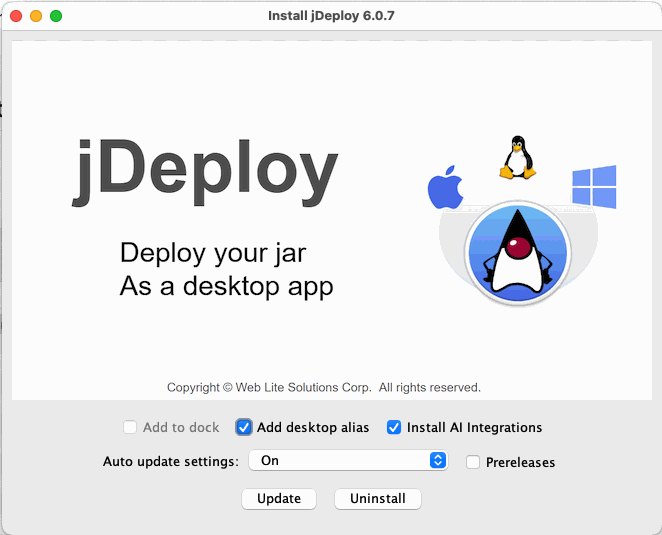
If the app bundle includes MCP tools and at least one supported AI tool is detected on the system, the installer adds an Install AI Integrations checkbox. Checking it opens a dialog where the user can select which AI tools to configure.

Multi-Modal App Support
Previous versions of jDeploy bundled only GUI desktop applications. jDeploy 6.0 extends the installer to support multiple application modes within a single package. You can now ship a desktop app, CLI tools, background services, and an MCP server all from one project.

CLI Commands
Define named command-line tools that are installed to the user’s PATH. The installer creates platform-appropriate wrapper scripts. When invoked, the launcher skips GUI initialization, connects stdin/stdout/stderr to the terminal, and forwards exit codes. Your Java main() receives only user-supplied arguments — all launcher internals are stripped.
{
  "jdeploy": {
    "commands": {
      "myapp-cli": {
        "description": "Run My App in command-line mode"
      }
    }
  }
}
Your application can detect that it’s running as a CLI command by checking the jdeploy.mode system property:
String mode = System.getProperty("jdeploy.mode", "gui");
if ("command".equals(mode)) {
    // CLI mode -- args contains only user-supplied arguments
    runCli(args);
} else {
    // GUI mode
    SwingUtilities.invokeLater(() -> new MainWindow().setVisible(true));
}
Each command entry can also include an args array of additional arguments that the launcher passes to your Java main() before any user-supplied arguments. This is useful when you have multiple commands that share the same JAR but need to distinguish which command was invoked.
For a working example, see the jdeploy-hello-commands project, a bare-bones app with a CLI command alongside its GUI.
Service Controllers
Add service lifecycle management to any CLI command. Users can run myapp-server service install, start, stop, status, and uninstall. All service registration and lifecycle management is handled by the native launcher — your Java app just needs to start its server logic and stay alive. The launcher registers it as a native system service (systemd on Linux, launchd on macOS, Windows Service Manager).
{
  "jdeploy": {
    "commands": {
      "myapp-server": {
        "description": "Web server for My App",
        "implements": ["service_controller"]
      }
    }
  }
}
Example user invocation:
myapp-server service install    # Register with system service manager
myapp-server service start      # Start the service
myapp-server service status     # Check if running
myapp-server service stop       # Stop the service
myapp-server service uninstall  # Unregister from service manager

myapp-server --port=9090        # Run directly as a CLI command
For a working example, see the jdeploy-service-example project, a Quarkus REST service deployed with jDeploy as a background service.
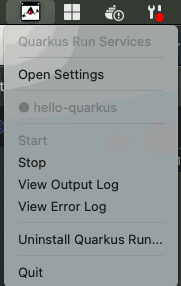
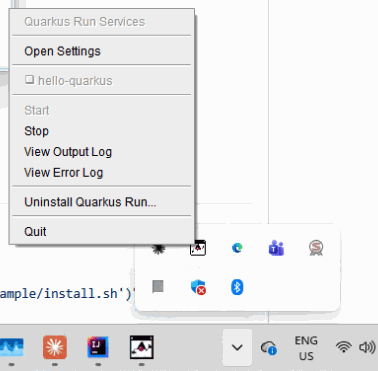
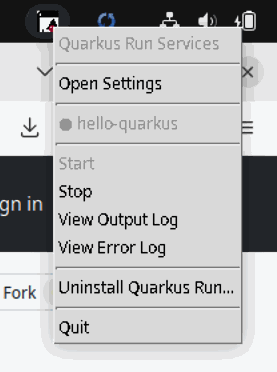
Background Helper (System Tray)
A system tray application that provides service management and uninstallation from the tray icon. The helper shows menus to start, stop, and view logs for services, and supports custom "helper actions" — quick-launch links to URLs, files, or custom protocol URLs that appear as tray menu items.
{
  "jdeploy": {
    "helper": {
      "actions": [
        {
          "label": "Dashboard",
          "description": "Open the web dashboard",
          "url": "http://localhost:8080/dashboard"
        }
      ]
    }
  }
}
Helper actions can also use custom URL schemes to deep-link into your GUI app. Register the scheme via urlSchemes in your jdeploy config:
{
  "jdeploy": {
    "urlSchemes": ["myapp"],
    "commands": {
      "myapp-server": {
        "description": "Web server",
        "implements": ["service_controller"]
      }
    },
    "helper": {
      "actions": [
        {
          "label": "Dashboard",
          "description": "Open the web dashboard",
          "url": "http://localhost:8080/dashboard"
        },
        {
          "label": "Settings",
          "description": "Open app settings in the GUI",
          "url": "myapp://settings"
        }
      ]
    }
  }
}
When using custom URL schemes, consider enabling "singleton": true in your jdeploy config so that clicking a link activates the existing window instead of launching a new instance. See Singleton Mode and jdeploy-desktop-lib for details.
Self-Updating Commands
Add self-update capability to any CLI command. When the user runs <command> update, the launcher triggers the jDeploy auto-update mechanism entirely within the native launcher — your Java code is never invoked.
{
  "jdeploy": {
    "commands": {
      "myapp-cli": {
        "description": "Run My App CLI",
        "implements": ["updater"]
      }
    }
  }
}
Implementations can be combined. For example, "implements": ["service_controller", "updater"] gives a command both service management and self-update capabilities.
Launcher Mode (GUI via CLI)
Provide a CLI shortcut that opens your GUI application. Unlike CLI commands, this launches the desktop app with jdeploy.mode=gui. Arguments are passed through as files or URLs to open. On macOS, this uses open -a to launch through the proper app bundle mechanism.
{
  "jdeploy": {
    "commands": {
      "myapp": {
        "description": "Open files in My App",
        "implements": ["launcher"]
      }
    }
  }
}
myapp document.txt # Opens file in the GUI app
myapp https://example.com # Opens URL in the GUI appRuntime Mode Detection
The native launcher passes -Djdeploy.mode=<mode> to the JVM. Two values are defined:
-
gui— Default GUI application -
command— CLI command (includes service controllers and MCP servers)
System Properties
jDeploy 6.0 injects a comprehensive set of system properties into the JVM:
| Property | Description |
|---|---|
|
Mode: |
|
Absolute path to the launcher executable |
|
Application version |
|
Application package name |
|
Package source (NPM registry URL or GitHub URL) |
|
|
|
|
|
|
|
Path to the runtime configuration file |
The launcher also supports conditional platform arguments in package.json:
-
-D[mac]property=value— only included on macOS -
-D[win]property=value— only included on Windows -
-D[linux]property=value— only included on Linux -
-D[mac|linux]property=value— included on macOS or Linux
Mode Summary
| Mode | jdeploy.mode |
Config Location | Purpose |
|---|---|---|---|
GUI |
|
(default) |
Desktop application |
CLI Command |
|
|
Command-line tools on PATH |
Service Controller |
|
|
Manage background daemons |
Background Helper |
N/A |
|
System tray management UI |
Updater |
N/A |
|
Self-update via CLI |
Launcher |
|
|
CLI shortcut to open GUI |
MCP Server |
|
|
AI tool integration |
Complete Multi-Mode Example
A single package deploying all modes:
{
  "name": "my-multi-tool",
  "version": "2.0.0",
  "jdeploy": {
    "javaVersion": "21",
    "jar": "target/my-tool.jar",
    "title": "My Multi-Tool",
    "commands": {
      "my-tool": {
        "description": "Open files in My Multi-Tool",
        "implements": ["launcher"]
      },
      "my-tool-cli": {
        "description": "Run in command-line mode",
        "args": ["-Dapp.role=cli"],
        "implements": ["updater"]
      },
      "my-tool-server": {
        "description": "Start the web server",
        "args": ["-Dapp.role=server", "-Dserver.port=8080"],
        "implements": ["service_controller", "updater"]
      },
      "my-tool-mcp": {
        "description": "MCP server for AI tools",
        "args": ["-Dapp.role=mcp"]
      }
    },
    "ai": {
      "mcp": {
        "command": "my-tool-mcp",
        "args": ["--stdio"],
        "defaultEnabled": true
      }
    },
    "helper": {
      "actions": [
        {
          "label": "Dashboard",
          "description": "Open the server dashboard",
          "url": "http://localhost:8080"
        }
      ]
    }
  }
}|
Note
|
The app.role system property used in this example is not a jDeploy-specific property. It is an arbitrary application-defined convention used here to distinguish which command was invoked. You can use any property names or argument patterns that suit your application.
|
The unified Java entry point for this example:
public class Main {
    public static void main(String[] args) {
        String mode = System.getProperty("jdeploy.mode", "gui");

        if ("command".equals(mode)) {
            String role = System.getProperty("app.role", "");
            switch (role) {
                case "cli":
                    runCli(Arrays.asList(args));
                    break;
                case "server":
                    runServer(Arrays.asList(args));
                    break;
                case "mcp":
                    runMcpServer();
                    break;
                default:
                    runCli(Arrays.asList(args));
                    break;
            }
        } else {
            SwingUtilities.invokeLater(() -> {
                MainWindow window = new MainWindow();
                window.setVisible(true);
                for (String arg : args) {
                    window.openFile(new File(arg));
                }
            });
        }
    }
}
Constraints
-
Branch installations do not support CLI commands, services, or MCP servers. Only GUI mode works for branch installs.
-
Command names must match
^[A-Za-z0-9][A-Za-z0-9._-]*$(max 255 characters). -
Command args cannot contain shell metacharacters (
;|&$()`). -
The
launcherimplementation is mutually exclusive with other implementations (it launches inguimode, notcommandmode). -
updaterandservice_controllercan be combined on the same command.
MCP Server and AI Tool Integration
jDeploy 6.0 can register your application as a Model Context Protocol (MCP) server that AI tools discover and use automatically. During installation, jDeploy configures the MCP server in the user’s AI tool configurations (e.g., Claude Desktop’s claude_desktop_config.json, VS Code’s settings.json).
Supported AI Tools
| Tool | MCP | Skills | Agents | Auto-Install |
|---|---|---|---|---|
Claude Desktop |
Yes |
No |
No |
Yes |
Claude Code |
Yes |
Yes |
Yes |
Yes |
Codex CLI |
Yes |
Yes |
No |
Yes |
VS Code (Copilot) |
Yes |
No |
No |
Yes |
Cursor |
Yes |
No |
No |
Yes |
Windsurf |
Yes |
No |
No |
Yes |
Gemini CLI |
Yes |
No |
No |
Yes |
OpenCode |
Yes |
No |
No |
Yes |
Warp |
Yes |
No |
No |
No |
JetBrains IDEs |
Yes |
No |
No |
No |
Configuration
The MCP server is backed by a CLI command defined in jdeploy.commands, so jdeploy.mode is command when running as an MCP server. The ai.mcp section references that command and controls installation behavior.
{
  "jdeploy": {
    "commands": {
      "myapp-mcp": {
        "description": "MCP server for AI integration",
        "args": ["--mcp-mode"]
      }
    },
    "ai": {
      "mcp": {
        "command": "myapp-mcp",
        "args": ["--verbose"],
        "defaultEnabled": true
      }
    }
  }
}
The ai.mcp.command must reference a command name defined in jdeploy.commands. The args in the ai.mcp section are additional arguments passed when the AI tool invokes the MCP server. defaultEnabled controls whether the MCP server is auto-enabled during installation.
For a working example, see the jdeploy-mcp-example project, a Quarkus MCP server deployed with jDeploy.
Java Detection
public static void main(String[] args) {
    String mode = System.getProperty("jdeploy.mode", "gui");

    if ("command".equals(mode)) {
        if (Arrays.asList(args).contains("--mcp-mode")) {
            // MCP server mode: communicate via stdin/stdout using MCP protocol
            startMcpServer();
        } else {
            runCli(Arrays.asList(args));
        }
    } else {
        SwingUtilities.invokeLater(() -> new MainWindow().setVisible(true));
    }
}
The MCP server communicates via stdin/stdout using the Model Context Protocol. The launcher injects the static args from both the command spec and the ai.mcp section before any user-supplied arguments.
Skills and Agents
Beyond MCP servers, jDeploy 6.0 also supports installing Claude Code skills and agents. Place them in your project’s jdeploy-bundle/ai/skills/ and jdeploy-bundle/ai/agents/ directories respectively. They are discovered during installation and configured in the user’s Claude Code settings.
Singleton Mode and jdeploy-desktop-lib
jDeploy 6.0 introduces singleton mode and a new Java library — jdeploy-desktop-lib — that together enable deep integration between your GUI application, web apps, and background services.
Singleton Mode
When "singleton": true is set in your jdeploy config, only one instance of your GUI application runs at a time. If the user launches the app again (by double-clicking a file, clicking a custom URL, or running the launcher command), the existing window is activated and the new file or URI is forwarded to it via IPC.
{
  "jdeploy": {
    "singleton": true,
    "urlSchemes": ["myapp"]
  }
}
This is particularly useful when combined with custom URL schemes and background services. A service or web app running on localhost can open myapp://settings to bring the GUI to the front and navigate to a specific view, rather than spawning a duplicate instance.
Custom URL schemes are registered in the URLs tab:
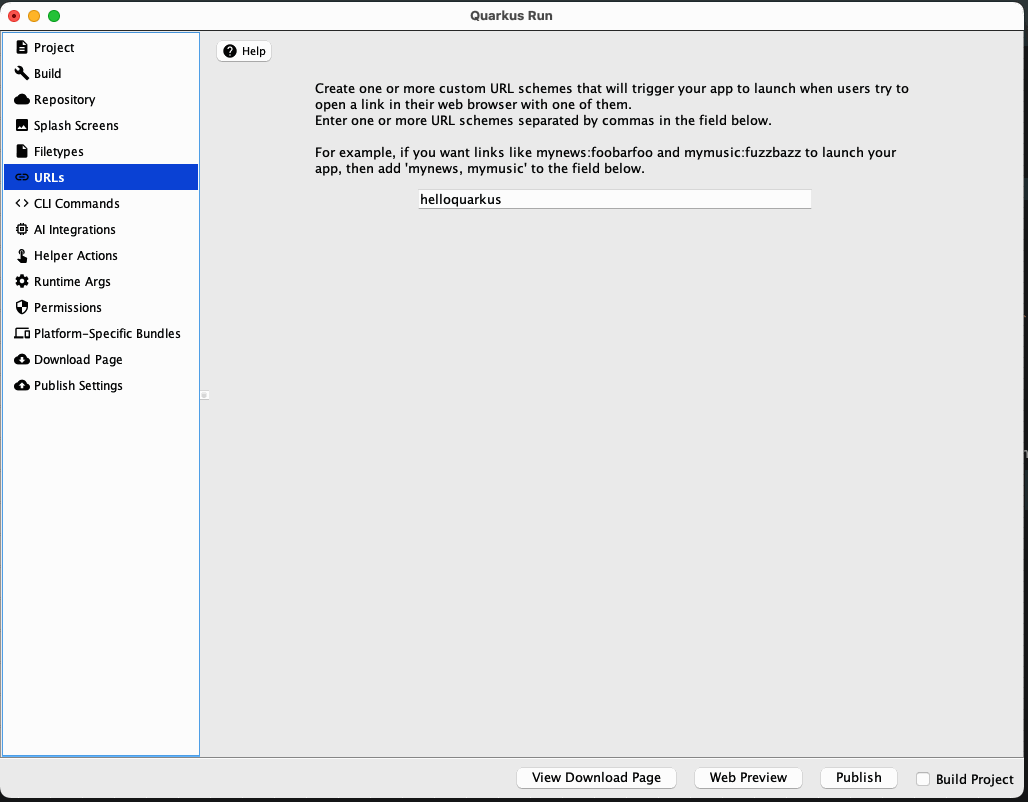
Singleton mode applies on Windows and Linux. macOS handles single-instance behavior natively through its Desktop API.
jdeploy-desktop-lib
To receive forwarded files, URIs, and activation events in your running application, add the jdeploy-desktop-lib dependency and register a JDeployOpenHandler.
Swing (ca.weblite:jdeploy-desktop-lib-swing:1.0.2):
JDeploySwingApp.setOpenHandler(new JDeployOpenHandler() {
    public void openFiles(List<File> files) { /* handle files */ }
    public void openURIs(List<URI> uris)   { /* handle URIs */ }
    public void appActivated()             { /* bring window to front */ }
});
JavaFX (ca.weblite:jdeploy-desktop-lib-javafx:1.0.2):
|
Important
|
On macOS, you must call JDeployFXApp.initialize() in your main() method before calling Application.launch(). This ensures the AWT Desktop handlers are registered while AWT is still the primary toolkit. Without this, deep links won’t be received on macOS.
|
public class MyApp extends Application {
    public static void main(String[] args) {
        JDeployFXApp.initialize();  // Required before launch() on macOS
        launch(args);
    }

    @Override
    public void start(Stage stage) {
        // Register handler in start()
        JDeployFXApp.setOpenHandler(new JDeployOpenHandler() {
            public void openFiles(List<File> files) { /* handle files */ }
            public void openURIs(List<URI> uris)   { /* handle URIs */ }
            public void appActivated()             { /* bring window to front */ }
        });
        // ... rest of start()
    }
}
Without this library, your app will not receive forwarded URIs or file-open events from subsequent launches.
Integration Scenarios
Singleton mode and jdeploy-desktop-lib open up several integration patterns:
-
Service-to-GUI: A background service (managed via
service_controller) hosts a web dashboard. Links on the dashboard usemyapp://URLs to open views in the native GUI app without spawning duplicates. -
Tray helper shortcuts: Helper actions in the system tray use custom URL schemes to deep-link into specific screens of the running GUI app.
-
File associations: The OS opens files with your app. In singleton mode, each file is routed to the existing instance rather than launching a new one.
-
Web-to-desktop handoff: A web application redirects to a
myapp://URL to hand off a workflow to the native desktop app.
Custom Windows Installation Directory (winAppDir)
By default, jDeploy installs app executables on Windows into %USERPROFILE%\.jdeploy\apps. Windows Defender and other security software may flag executables running from this non-standard location. jDeploy 6.0 introduces the winAppDir property, which lets you install into a conventional location such as %USERPROFILE%\AppData\Local\Programs instead.
{
  "jdeploy": {
    "winAppDir": "AppData\\Local\\Programs"
  }
}
The value is a relative path resolved against the user’s home directory (%USERPROFILE%). This property only affects Windows installations — macOS and Linux are unaffected.
Migration Guide
Upgrading from 5.x
jDeploy 6.0 is backward compatible with 5.x. Existing packages that only use GUI mode continue to work with no changes. To adopt the new features:
-
Add CLI commands: Define entries in
jdeploy.commandsto install command-line tools alongside your GUI app -
Add services: Use
"implements": ["service_controller"]on commands that should run as background daemons -
Add MCP support: Define an
ai.mcpsection to register your app with AI tools -
Add a system tray helper: Configure
helper.actionsto give users quick access to dashboards and controls -
Customize Windows install path: Set
winAppDirto avoid Windows Defender warnings
All new features are opt-in and can be adopted incrementally.
Resources
-
Official Website: https://www.jdeploy.com/
-
Download: https://github.com/shannah/jdeploy-desktop-gui/releases/latest
-
Documentation: https://www.jdeploy.com/docs/manual/
-
GitHub Repository: https://github.com/shannah/jdeploy
-
Support: GitHub Issues and Discussions
Example Projects
-
jdeploy-hello-commands — Bare-bones app with a CLI command alongside a Swing GUI
-
jdeploy-service-example — Quarkus REST service deployed as a background service with system tray helper
-
jdeploy-mcp-example — Quarkus MCP server for AI tool integration