This tutorial walks you through building a command-line application using picocli and distributing it with jDeploy. You’ll learn about jDeploy 6.0’s new CLI command support and discover how you can offer your users two installation paths — npm/npx and native installers — from a single project.
Introduction
What We’re Building
We’ll create a simple command-line tool using picocli, a powerful library for building CLI applications in Java. The tool will be fully distributable to end users on Windows, macOS, and Linux.
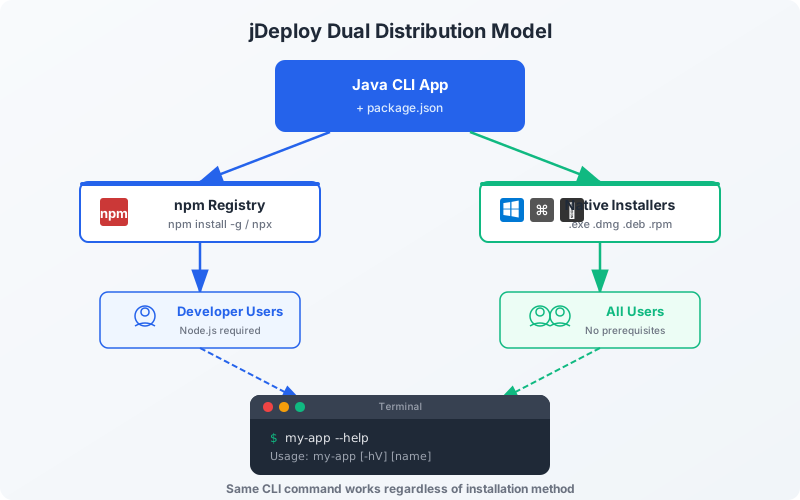
The Dual Distribution Model
Historically, jDeploy has always supported distributing Java applications via npm. Users could install your CLI tool with:
npm install -g your-cli
your-cli --help
Or run it without installation:
npx your-cli --helpThis works well for developers who already have Node.js installed. But what about non-developer users?
jDeploy 6.0 introduces native CLI command support through the desktop installer. Now, when users install your application using the jDeploy installer, CLI commands are automatically added to their system PATH. No Node.js required — just a native executable that works like any other command-line tool.
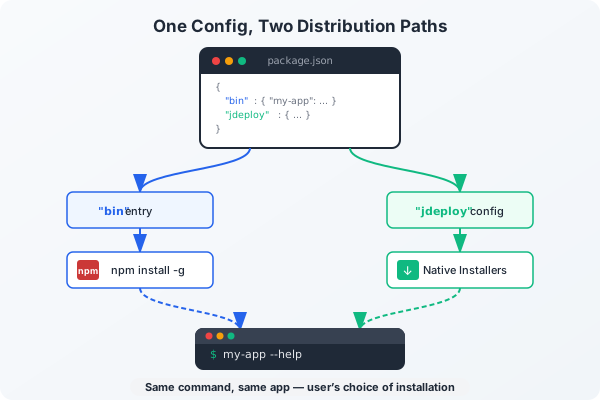
The key insight: you don’t have to choose between these approaches. The same package.json configuration supports both. Publish to npm, and your users can install via npm/npx or download the native installer. Same app, same version, two installation paths.
Prerequisites
Before starting this tutorial, ensure you have:
-
Java 21 or higher installed
-
Node.js and npm (for the jDeploy CLI and publishing)
-
jDeploy Desktop App or jDeploy CLI (
npm install -g jdeploy)
To verify your Java installation:
java -versionTo install the jDeploy CLI (if not using the desktop app):
npm install -g jdeployCreating the Project
You can create a new picocli project using either the jDeploy Desktop App or the command line. Both methods generate identical project structures.
Option A: Using jDeploy Desktop App
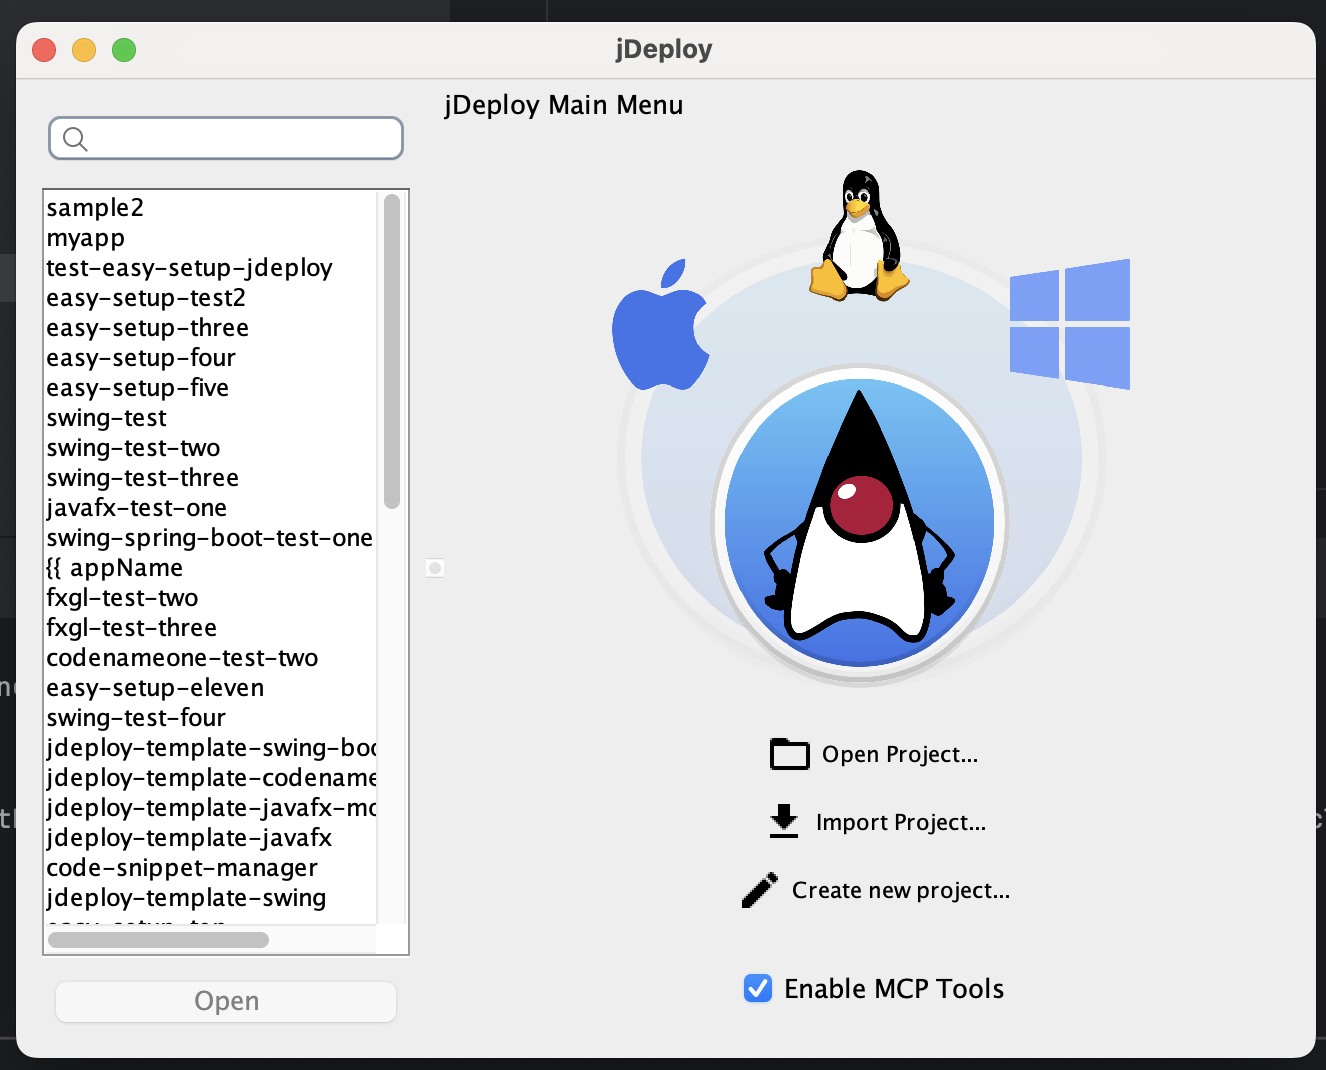
Step 1: Open jDeploy and Create New Project
Launch the jDeploy Desktop App. From the main menu, click "Create new project…".
Step 2: Select the Picocli Template
In the template selection dialog, find and select "Picocli CLI Maven Starter". This template is pre-configured with picocli, Maven, and jDeploy settings optimized for CLI applications.
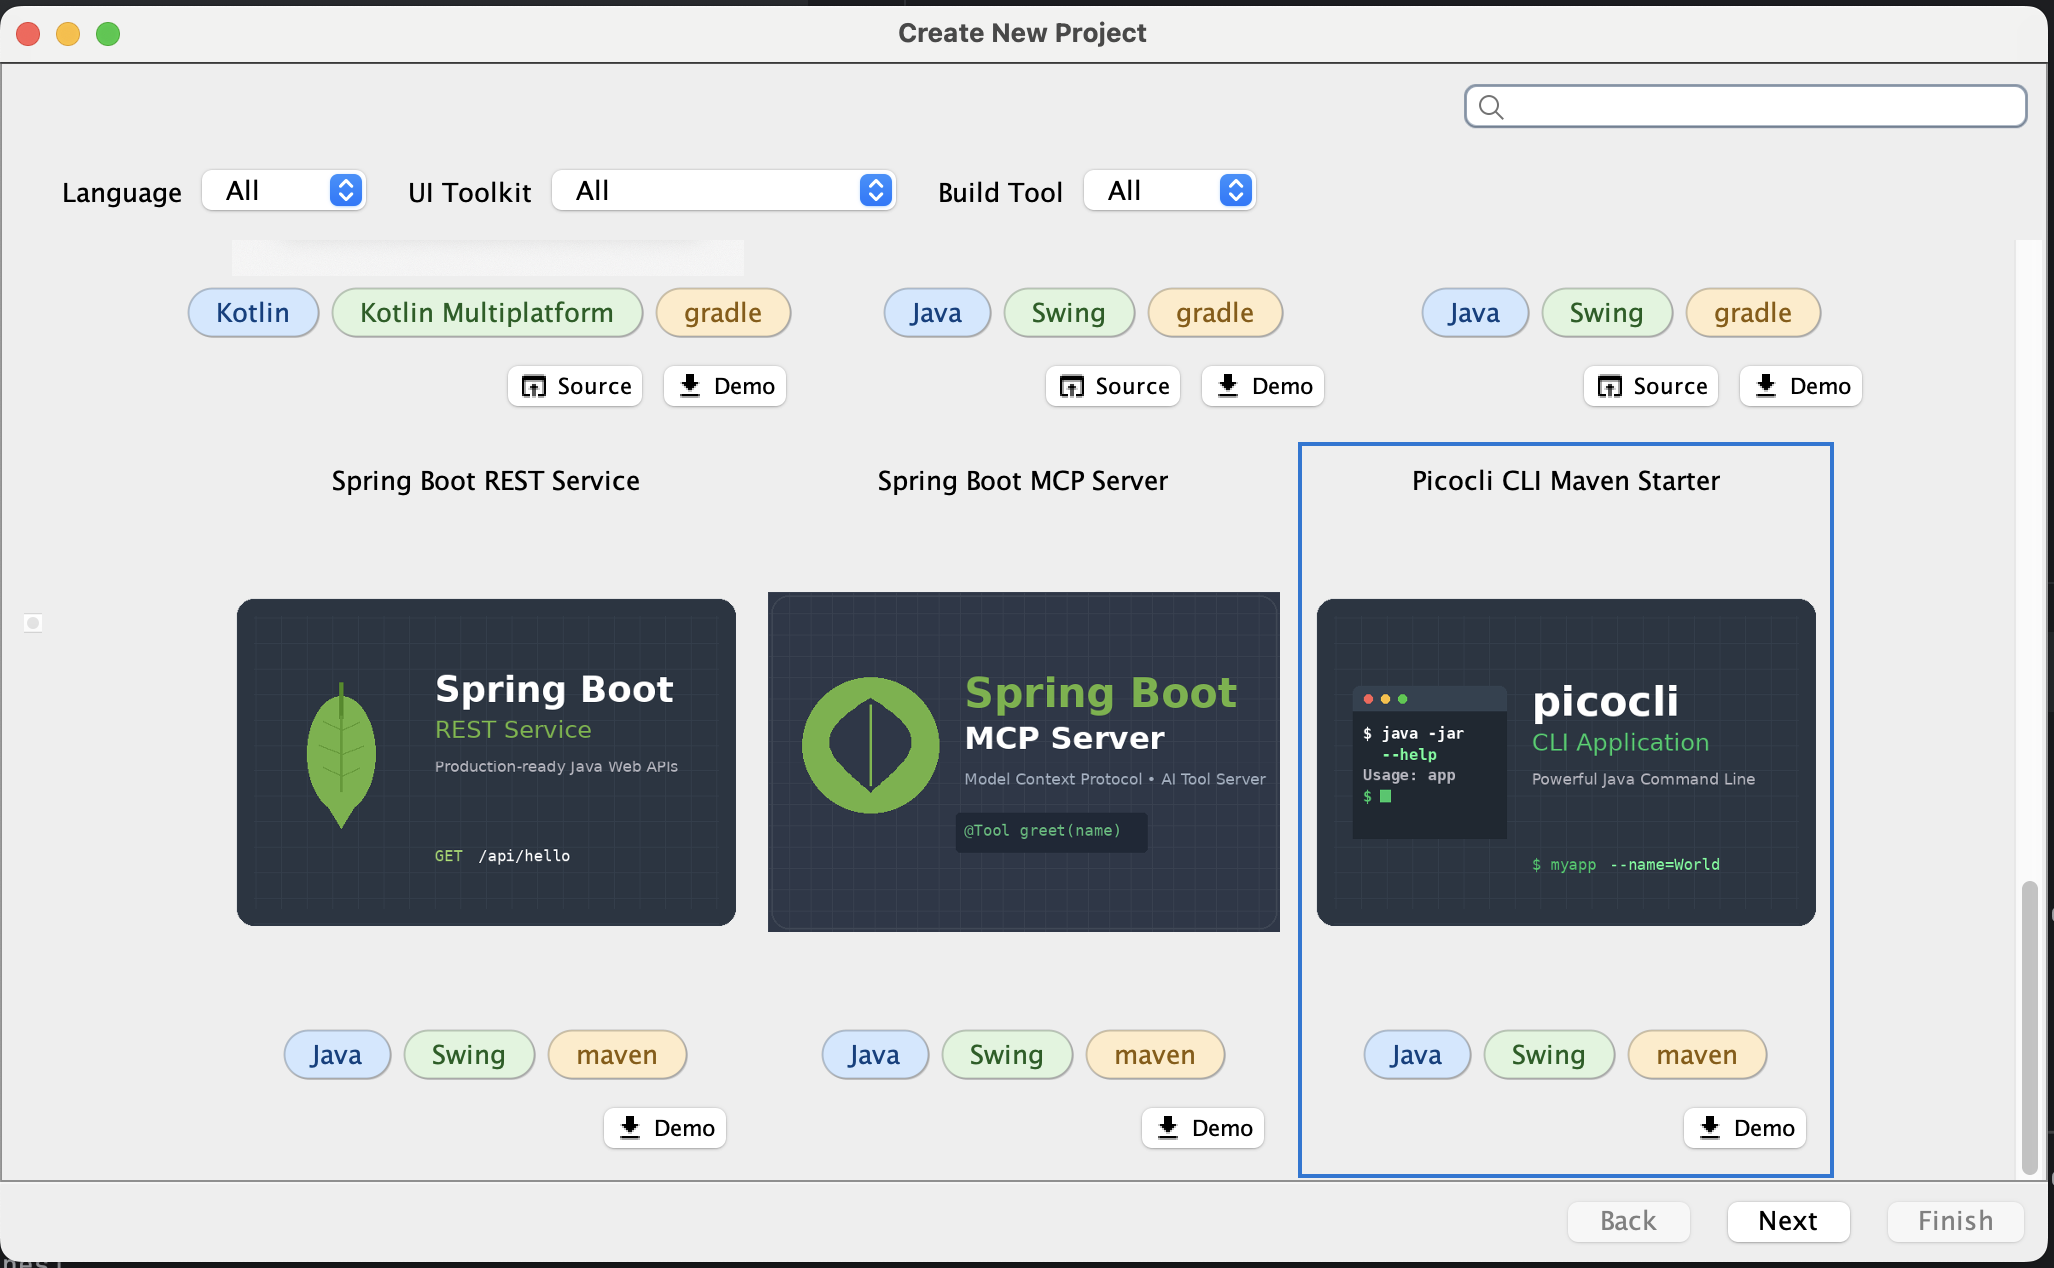
Click Next to continue.
Step 3: Configure Project Settings
Fill in your project details:
-
Application Display Name: The human-readable name (e.g., "My CLI Tool")
-
Group ID: Your Maven group ID (e.g., "com.example")
-
Artifact ID: Your Maven artifact ID and command name (e.g., "my-cli")
-
Project Location: Where to create the project on disk
-
Publish to: Choose GitHub or npm for your distribution target
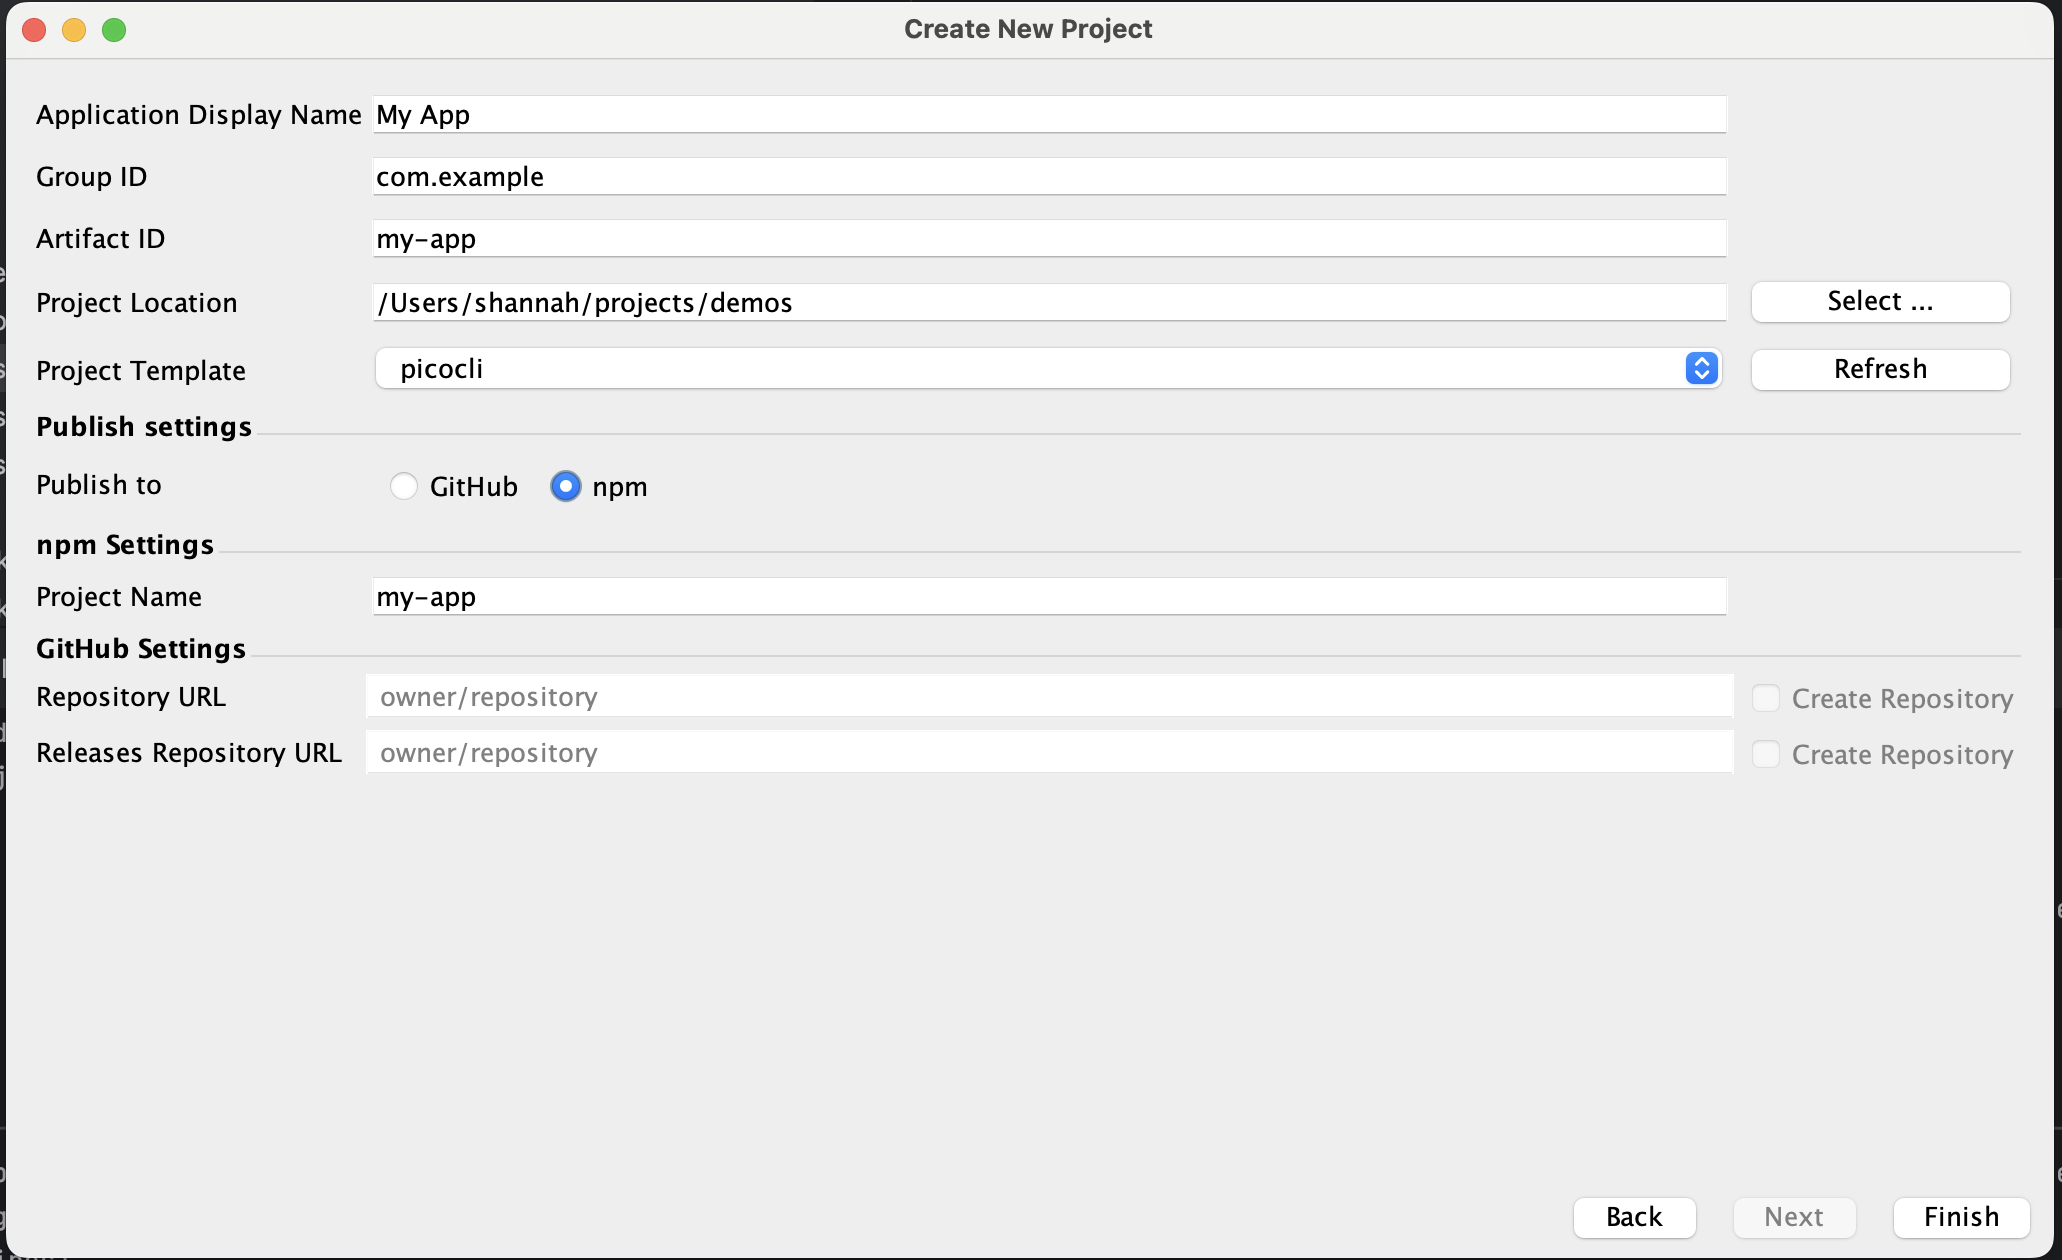
Click Finish to generate the project.
Option B: Using jDeploy CLI
Open a terminal and run:
jdeploy generate -t picocliFollow the interactive prompts to configure your project name, group ID, and other settings.
$ jdeploy generate -t picocli
Project generated at: ./my-app
The generated project structure:
my-app/
├── .github/
│   └── workflows/
│       └── jdeploy.yml        # GitHub Actions workflow
├── .mvn/
│   └── wrapper/               # Maven wrapper files
├── src/
│   └── main/
│       └── java/
│           └── com/example/myapp/
│               └── Main.java  # Your CLI application
├── icon.png                   # Application icon
├── tile.png                   # Tile image for jDeploy
├── mvnw                       # Maven wrapper (Unix)
├── mvnw.cmd                   # Maven wrapper (Windows)
├── package.json               # jDeploy configuration
├── pom.xml                    # Maven build configuration
└── README.md
Understanding the Generated Project
Let’s examine the key files that make this CLI application work.
The Main Application (Main.java)
The generated Main.java demonstrates picocli’s annotation-based approach to building CLIs:
package com.example.myapp;

import picocli.CommandLine;
import picocli.CommandLine.Command;
import picocli.CommandLine.Option;
import picocli.CommandLine.Parameters;

import java.util.concurrent.Callable;

@Command(name = "my-app",
        mixinStandardHelpOptions = true,
        version = "1.0",
        description = "My App - a picocli CLI application.")
public class Main implements Callable<Integer> {

    @Parameters(index = "0", defaultValue = "World",
            description = "The name to greet (default: ${DEFAULT-VALUE}).")
    private String name;

    @Option(names = {"-c", "--count"}, defaultValue = "1",
            description = "Number of times to print the greeting (default: ${DEFAULT-VALUE}).")
    private int count;

    @Override
    public Integer call() {
        for (int i = 0; i < count; i++) {
            System.out.println("Hello, " + name + "!");
        }
        return 0;
    }

    public static void main(String[] args) {
        String mode = System.getProperty("jdeploy.mode", "command");

        if ("gui".equals(mode)) {
            // GUI mode: show an about dialog
            javax.swing.SwingUtilities.invokeLater(() -> {
                javax.swing.JOptionPane.showMessageDialog(
                    null,
                    "My App v1.0\n\nThis is a command-line tool.\n"
                        + "Run 'my-app --help' in a terminal for usage.",
                    "About My App",
                    javax.swing.JOptionPane.INFORMATION_MESSAGE
                );
                System.exit(0);
            });
            return;
        }

        // CLI mode: run the command
        int exitCode = new CommandLine(new Main()).execute(args);
        System.exit(exitCode);
    }
}
Key points:
-
@Commanddefines the command name, version, and description -
@Parameterscaptures positional arguments -
@Optiondefines named options like-cor--count -
mixinStandardHelpOptions = trueautomatically adds--helpand--version -
jdeploy.modedetection allows the same JAR to behave differently when launched as a GUI app vs CLI command
The jDeploy Configuration (package.json)
The package.json file configures both npm distribution and the native installer:
{
  "name": "my-app",
  "version": "1.0-SNAPSHOT",
  "description": "jDeploy Picocli CLI Starter Project",
  "bin": {
    "my-app": "jdeploy-bundle/jdeploy.js"
  },
  "jdeploy": {
    "jdk": false,
    "javaVersion": "21",
    "jar": "target/my-app-1.0-SNAPSHOT.jar",
    "javafx": false,
    "title": "My App",
    "buildCommand": [
      "./mvnw",
      "package"
    ],
    "commands": {
      "my-app": {
        "description": "My App CLI"
      }
    }
  },
  "dependencies": { ... },
  "files": ["jdeploy-bundle"]
}
Two sections control CLI distribution:
-
bin: The npm entry point. This enablesnpm install -g my-appandnpx my-app. -
jdeploy.commands: The native installer configuration (new in jDeploy 6.0). This tells the installer to create amy-appcommand in the user’s PATH.
Both point to the same underlying Java application, but they use different launchers:
-
npm uses a Node.js wrapper script
-
The native installer uses a compiled native launcher
The Maven Configuration (pom.xml)
The pom.xml includes:
-
picocli dependency for CLI annotations and parsing
-
maven-jar-plugin configured with classpath and main class
-
maven-dependency-plugin to copy dependencies to
target/libs/ -
jdeploy-maven-plugin to sync version numbers with
package.json
<dependencies>
    <dependency>
        <groupId>info.picocli</groupId>
        <artifactId>picocli</artifactId>
        <version>4.7.6</version>
    </dependency>
</dependencies>
Building and Testing Locally
Build the Project
First, make the Maven wrapper executable (Unix/macOS):
chmod +x mvnwThen build:
./mvnw packageOn Windows, use mvnw.cmd package instead.
Test the JAR Directly
Run the built JAR to verify it works:
$ java -jar target/my-app-1.0-SNAPSHOT.jar
Hello, World!

$ java -jar target/my-app-1.0-SNAPSHOT.jar Alice
Hello, Alice!

$ java -jar target/my-app-1.0-SNAPSHOT.jar Alice -c 3
Hello, Alice!
Hello, Alice!
Hello, Alice!

$ java -jar target/my-app-1.0-SNAPSHOT.jar --help
Usage: my-app [-hV] [-c=<count>] [<name>]
My App - a picocli CLI application.
      [<name>]      The name to greet (default: World).
  -c, --count=<count>
                    Number of times to print the greeting (default: 1).
  -h, --help        Show this help message and exit.
  -V, --version     Print version information and exit.
Two Distribution Paths, One Package
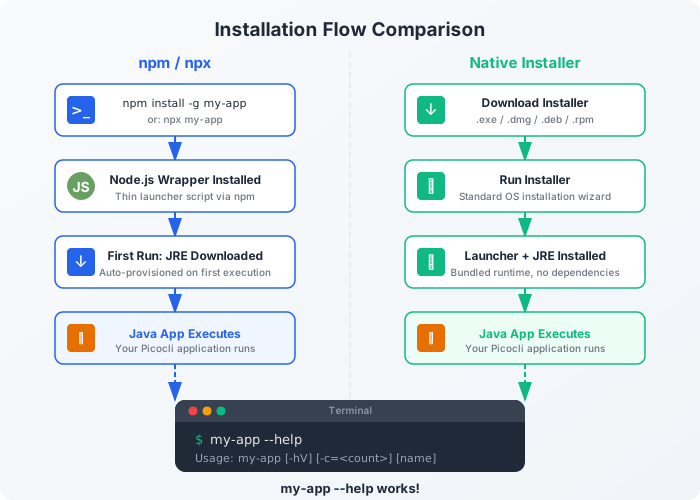
This is where jDeploy 6.0 shines. Your single package.json enables two completely different installation experiences for your users.
Path 1: npm/npx (For Developers)
This approach has been available since jDeploy 1.0 and works great for users who already have Node.js installed.
How It Works
When you publish to npm, jDeploy creates a package containing:
-
A small Node.js wrapper script (
jdeploy.js) -
Your application JAR and dependencies
-
Metadata for downloading the appropriate JRE if needed
When users run your command, the Node.js wrapper:
-
Checks for/downloads a suitable JRE
-
Launches your JAR with the correct arguments
-
Forwards stdin/stdout/stderr and exit codes
User Experience
# Install globally
npm install -g my-app

# Run the command
my-app --help
my-app Alice -c 3

# Or run without installing
npx my-app --help
Pros
-
Familiar workflow for developers
-
No separate installer download
-
Easy to switch between versions (
npm install -g my-app@2.0) -
Works anywhere Node.js is installed
Cons
-
Requires Node.js on the user’s machine
-
First run may be slow (JRE download)
-
Less "native" feel
Path 2: Native Installer (For Everyone)
New in jDeploy 6.0, the native installer approach provides a traditional desktop application installation experience.
How It Works
The jDeploy installer:
-
Installs a native launcher executable to the system
-
Bundles or downloads the appropriate JRE
-
Registers CLI commands in the system PATH
-
Creates Start Menu/Applications entries
The native launcher is a compiled executable (not a script) that:
-
Starts instantly (no interpreter overhead)
-
Properly handles stdin/stdout/stderr
-
Forwards exit codes correctly
-
Integrates with the OS signal handling
User Experience
Users download the installer for their platform from your GitHub releases page or website:
After installation:
# The command is immediately available in any new terminal
my-app --help
my-app Alice -c 3
Pros
-
No Node.js required
-
Native performance and behavior
-
Professional installation experience
-
Works for non-developer users
-
Automatic updates (if configured)
Cons
-
Users must download and run an installer
-
Larger initial download (includes JRE)
Side-by-Side Comparison
| Aspect | npm/npx | Native Installer |
|---|---|---|
Requires Node.js |
Yes |
No |
Requires installer download |
No |
Yes |
First-run speed |
Slower (JRE download) |
Fast (JRE bundled) |
Updates |
|
Auto-update or re-download |
Target audience |
Developers |
Everyone |
Command availability |
After |
After installer runs |
Why You Don’t Have to Choose
Here’s the key insight: the same package.json supports both distribution methods.
When you publish your package to npm:
-
The npm package is available for
npm install -gandnpx -
jDeploy can generate native installers from the same package
-
GitHub Actions can automatically build installers on every release
Your users get to choose their preferred installation method:
-
Developer installing a build tool? →
npm install -g my-app -
Quick one-time use? →
npx my-app -
Non-technical user? → Download the installer
-
Corporate environment without Node.js? → Download the installer
The Configuration That Enables Both
Look at your package.json again:
{
  "bin": {
    "my-app": "jdeploy-bundle/jdeploy.js"    (1)
  },
  "jdeploy": {
    "commands": {
      "my-app": {                              (2)
        "description": "My App CLI"
      }
    }
  }
}| 1 | The bin entry enables npm/npx distribution |
| 2 | The commands entry enables native installer CLI support |
Both entries use the same command name (my-app) and point to the same underlying Java application. The only difference is the launcher mechanism.
Publishing Your CLI
Once you’re happy with your CLI application, it’s time to publish it.
Option A: Using jDeploy Desktop App
-
Open your project in jDeploy Desktop App
-
Click the Publish button
-
jDeploy will:
-
Build your application (runs
./mvnw package) -
Create the jdeploy-bundle
-
Publish to npm and/or create GitHub release
-
Option B: Using jDeploy CLI
# Build and publish
jdeploy publish
For npm publishing, ensure you’re logged in:
npm login
jdeploy publish
Option C: Automated Publishing with GitHub Actions
The generated project includes a GitHub Actions workflow (.github/workflows/jdeploy.yml) that automatically:
-
Builds your application on push to snapshot branches or version tags
-
Creates native installers for all platforms
-
Uploads installers as GitHub release assets
To trigger a release:
# Create and push a version tag
git tag v1.0.0
git push origin v1.0.0
The workflow will create a GitHub release with downloadable installers.
Adding Self-Update Support
jDeploy 6.0 allows CLI commands to update themselves. Users can run my-app update to download and install the latest version.
To enable this, add the updater implementation to your command:
{
  "jdeploy": {
    "commands": {
      "my-app": {
        "description": "My App CLI",
        "implements": ["updater"]
      }
    }
  }
}
Now users can update with:
my-app updateThe update is handled entirely by the native launcher — your Java code isn’t involved. The launcher checks for new versions, downloads updates, and installs them.
Self-update only works with the native installer distribution, not npm. npm users update with npm update -g my-app.
|
Customizing Your CLI
Now that you understand the project structure, here are some ways to extend your CLI.
Adding Subcommands
Picocli makes it easy to create complex CLIs with subcommands:
@Command(name = "my-app",
        subcommands = {
            InitCommand.class,
            BuildCommand.class,
            DeployCommand.class
        })
public class Main implements Callable<Integer> {
    // ...
}

@Command(name = "init", description = "Initialize a new project")
class InitCommand implements Callable<Integer> {
    @Override
    public Integer call() {
        System.out.println("Initializing...");
        return 0;
    }
}
Usage: my-app init, my-app build, my-app deploy
Adding Multiple CLI Commands
You can expose multiple commands from the same JAR by adding more entries to the commands section:
{
  "jdeploy": {
    "commands": {
      "my-app": {
        "description": "Main CLI interface"
      },
      "my-app-server": {
        "description": "Start the server",
        "args": ["--server-mode"]
      }
    }
  }
}
Your Java code can check for the --server-mode argument to determine which mode to run in.
Making It a Service
If your CLI can run as a background service (like a server), you can add service controller support:
{
  "jdeploy": {
    "commands": {
      "my-app-server": {
        "description": "My App Server",
        "implements": ["service_controller", "updater"]
      }
    }
  }
}
This enables:
my-app-server service install
my-app-server service start
my-app-server service status
my-app-server service stop
my-app-server service uninstall
See the jDeploy 6.0 Release Notes for full details on service controllers.
Conclusion
You’ve learned how to:
-
Create a picocli CLI project using jDeploy’s template
-
Build and test your CLI locally
-
Understand the dual distribution model (npm vs native installer)
-
Publish your CLI for both distribution paths
-
Extend your CLI with self-updates, subcommands, and services
The key takeaway: jDeploy 6.0 lets you reach both developer and non-developer users with a single project configuration. Publish to npm, and your users can choose the installation method that works best for them.
Resources
Example Projects
-
jdeploy-hello-commands — Simple app with CLI command alongside GUI
-
jdeploy-service-example — CLI with background service support