This tutorial shows you how to make a JavaFX desktop application scriptable by AI agents using the Model Context Protocol (MCP). We’ll build a Note Manager app that AI agents like Claude can control — creating notes, searching, navigating the UI, and exporting data — all through natural language.
Introduction
The Vision: AppleScript for the AI Age
For decades, macOS apps have supported AppleScript: a way for external scripts to control applications through high-level, semantic commands. Instead of simulating mouse clicks, a script can say tell application "Keynote" to start the slideshow or tell application "Mail" to make new outgoing message. The app exposes what it can do, and the caller decides when to do it.
This pattern is incredibly powerful, but it has always been limited to macOS and to traditional scripting. What if we could bring the same idea to Java desktop applications — cross-platform — and make them scriptable by AI agents?
That’s what this tutorial builds. Using jDeploy 6.0’s MCP server support and deep linking, we’ll create a JavaFX application that AI agents can script through the Model Context Protocol. The AI doesn’t need to see the screen or simulate clicks. It calls well-defined MCP tools like create_note, search_notes, or show_note, and the app responds with structured data.
What We’re Building
A Note Manager JavaFX application with two personalities:
-
GUI mode — A desktop note-taking app with a sidebar, editor, and search
-
MCP server mode — A headless process that exposes the app’s capabilities as MCP tools
The MCP server communicates with the running GUI via the jdeploy-desktop-lib-bridge library, which handles all IPC complexity. An AI agent can:
-
Create, read, and search notes
-
Navigate the GUI to display a specific note
-
Export notes to files
All from a natural language conversation.
Architecture Overview
The core challenge is that MCP servers run as CLI processes (communicating via stdin/stdout), while the JavaFX app runs as a separate GUI process. We need inter-process communication between them.
jDeploy 6.0 provides the building blocks:
-
MCP server support — deploy a CLI command as an MCP server that AI tools discover automatically
-
Singleton mode — ensures one GUI instance; commands route to it instead of launching duplicates
-
GUI Bridge library — the
jdeploy-desktop-lib-bridgemodule handles all IPC complexity, providing a simpleGuiBridgeAPI for the MCP server andGuiBridgeReceiverfor the GUI
The bridge supports two modes:
-
Background — Data queries are processed without interrupting the user. The GUI stays in the background.
-
Foreground — UI commands like
show_notebring the GUI to front so the user can see the result.
The flow for every MCP tool call:
This is the approach we’ll implement in this tutorial.
Prerequisites
Before starting, ensure you have:
-
Java 21 or higher installed
-
jDeploy Desktop App version 6.0 or later (download)
-
A GitHub account for publishing
-
An AI tool that supports MCP — Claude Code, Claude Desktop, VS Code Copilot, Cursor, etc.
-
Basic familiarity with JavaFX and Quarkus
Project Setup
We’ll create the project using the jDeploy Desktop App and the Quarkus MCP Server template. This gives us Quarkus’s @Tool annotation-based MCP server framework combined with jDeploy’s multi-modal packaging, pre-configured with a GitHub Actions workflow for publishing.
Step 1: Create a New Project
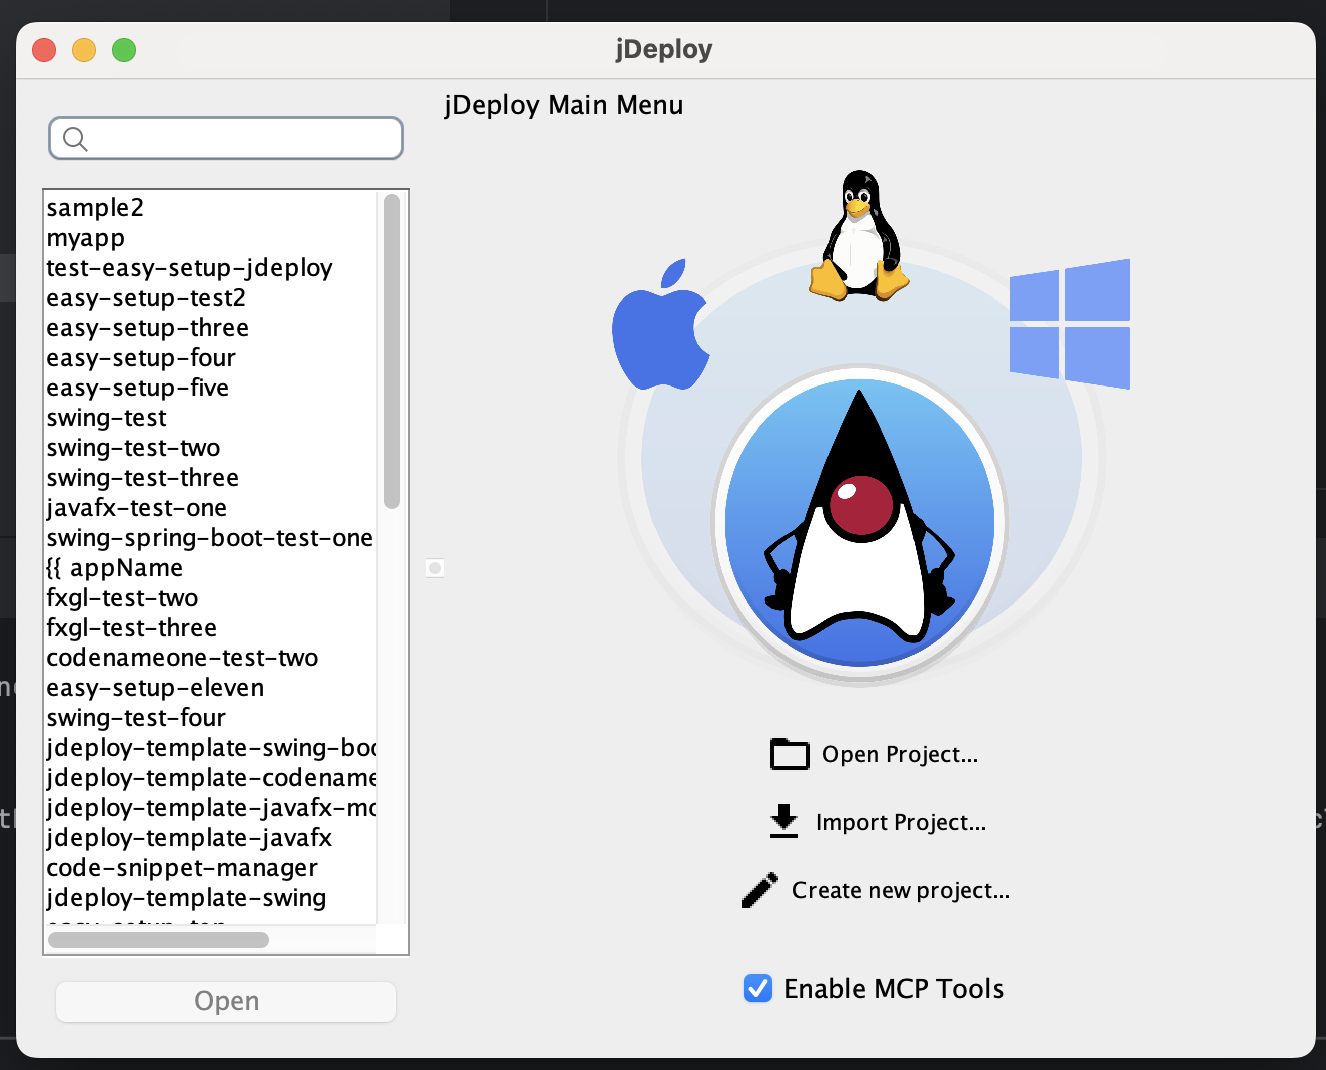
Launch the jDeploy Desktop App. From the main menu, click "Create new project…".
Step 2: Select the Quarkus MCP Server Template
In the template selection dialog, find and select "Quarkus MCP Server". This template includes:
-
Quarkus with the
quarkus-mcp-server-stdioextension for MCP protocol handling -
A Gradle build with an uber-jar task
-
A GitHub Actions workflow for jDeploy publishing
-
A
package.jsonpre-configured with an MCP command
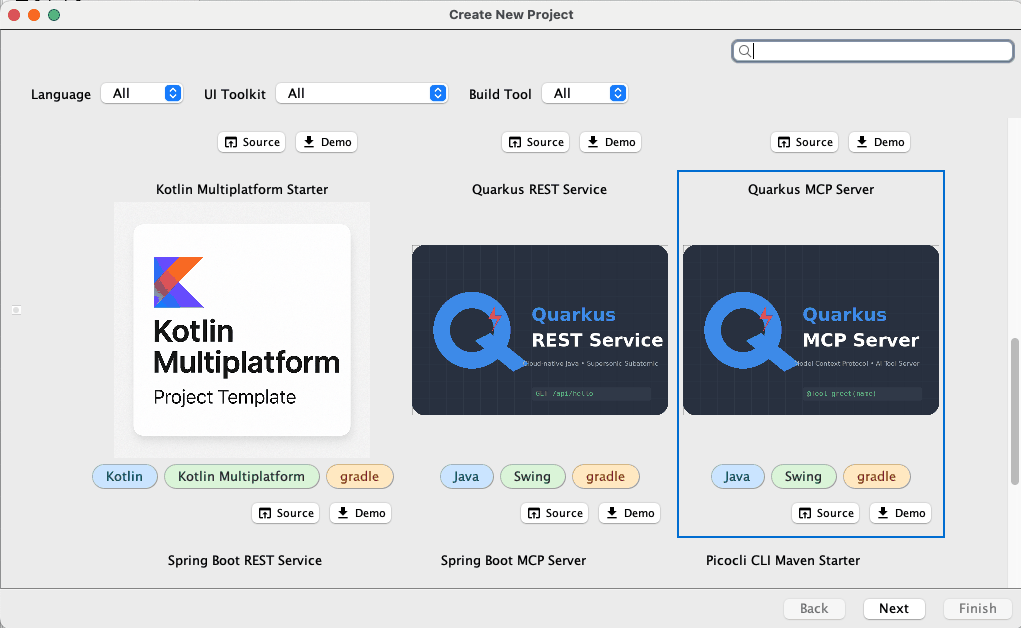
Click Next to continue.
Step 3: Configure Project Settings
Fill in the project details:
-
Application Display Name:
Note Manager -
Group ID:
com.example -
Artifact ID:
note-manager -
Project Location: Choose where to create the project on disk
-
Publish to: Select GitHub and enter your repository (e.g.,
yourusername/note-manager)
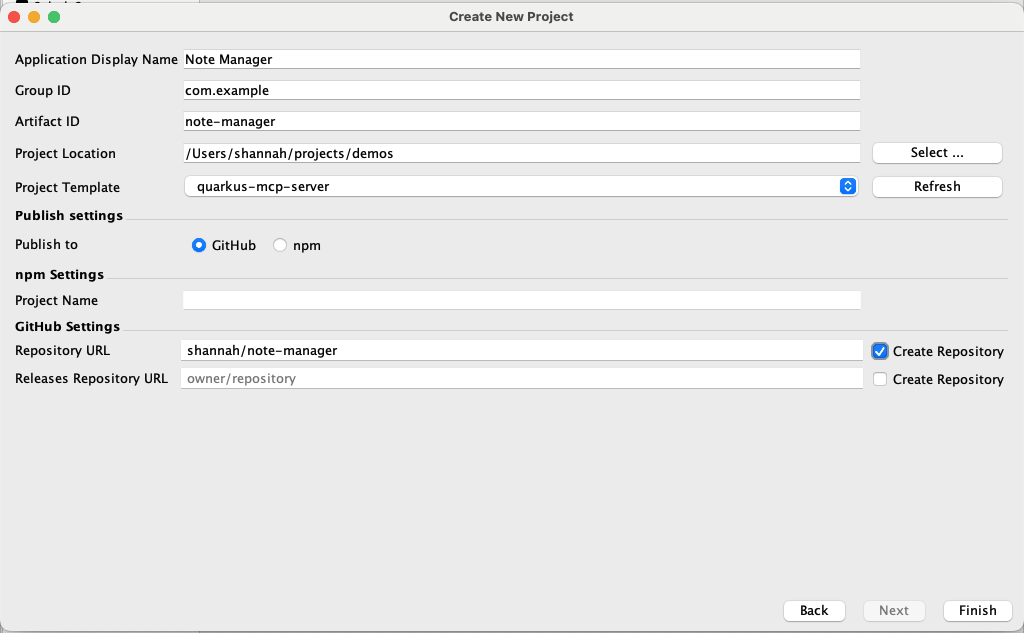
Click Finish to generate the project.
Generated Project Structure
jDeploy generates the following project structure:
note-manager/
├── .github/
│   └── workflows/
│       └── jdeploy.yml          # GitHub Actions workflow for publishing
├── gradle/
│   └── wrapper/                 # Gradle wrapper files
├── src/
│   └── main/
│       ├── java/
│       │   └── com/example/notemanager/
│       │       ├── NoteManager.java   # Entry point with mode detection
│       │       └── GreetingTools.java # Sample MCP tools (we'll replace)
│       └── resources/
│           └── application.properties
├── build.gradle                 # Gradle build configuration
├── gradle.properties            # Quarkus version properties
├── gradlew / gradlew.bat       # Gradle wrapper scripts
├── settings.gradle              # Gradle settings
├── icon.png                     # Application icon
├── package.json                 # jDeploy configuration
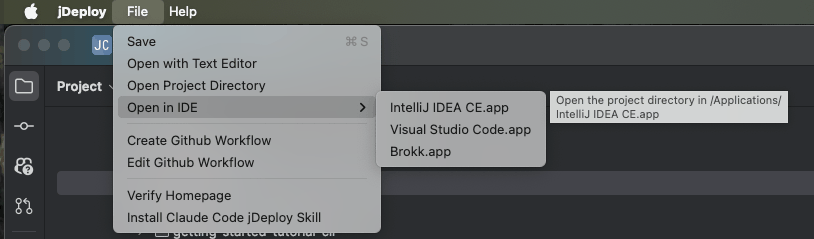
└── README.md| You can open the project in your preferred IDE using File > Open in IDE in the jDeploy Desktop App. |
Step 4: Add JavaFX and jDeploy Desktop Lib Dependencies
The generated template includes Quarkus and MCP dependencies. We need to add JavaFX (for the GUI) and the jDeploy Desktop Lib modules for deep linking, singleton support, and GUI-to-MCP communication.
Open build.gradle and add these dependencies:
// JavaFX
implementation 'org.openjfx:javafx-controls:21'

// jDeploy Desktop Lib - use BOM for version management
implementation platform('ca.weblite:jdeploy-desktop-lib-bom:1.0.0')
implementation 'ca.weblite:jdeploy-desktop-lib-javafx'
implementation 'ca.weblite:jdeploy-desktop-lib-hive-filewatcher'
implementation 'ca.weblite:jdeploy-desktop-lib-bridge'
The modules provide:
-
jdeploy-desktop-lib-javafx— JavaFX integration for deep linking and singleton support -
jdeploy-desktop-lib-hive-filewatcher— Enables background IPC (required by the bridge) -
jdeploy-desktop-lib-bridge— High-level API for MCP-to-GUI communication viaGuiBridgeandGuiBridgeReceiver
Step 5: Configure JavaFX, Deep Linking, and Singleton Mode
The generated package.json already has an MCP command (note-manager) configured. We need to enable JavaFX support, singleton mode, a custom URL scheme, and configure the MCP args so our app can distinguish MCP mode from GUI mode.
Open the project in the jDeploy Desktop App and configure the following settings:
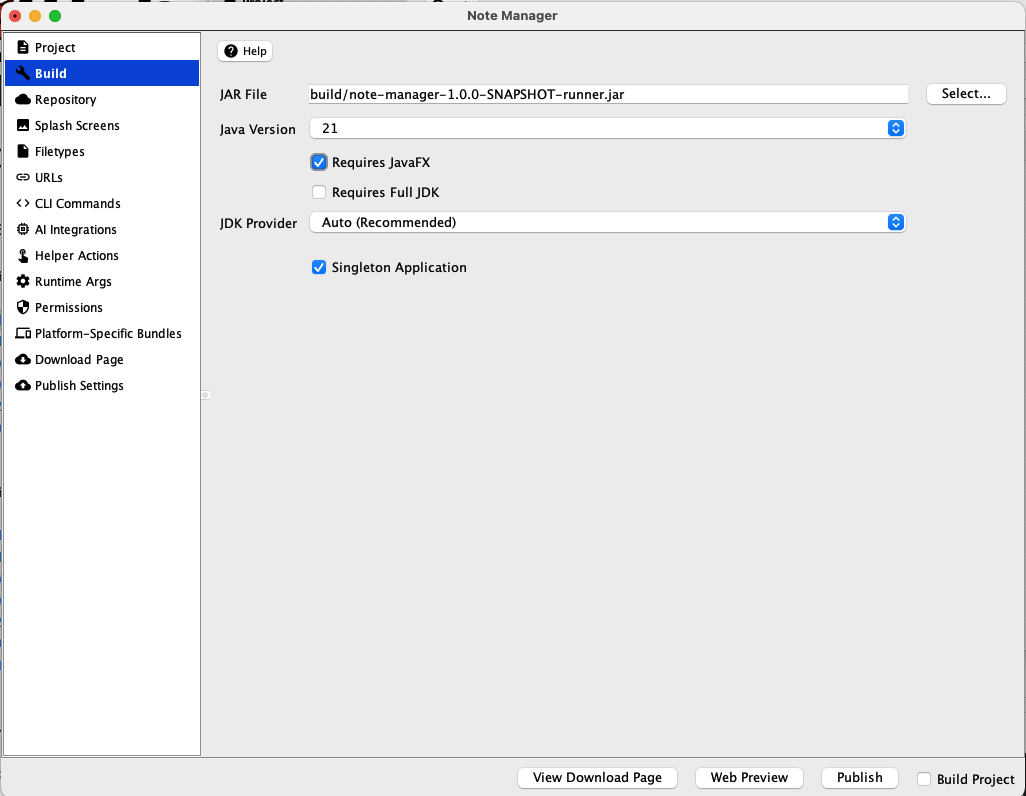
Enable JavaFX and Singleton Mode
Click Build in the side navigation. Check both JavaFX Application (to bundle JavaFX with the app) and Singleton Application (to ensure only one instance runs).
Register the URL Scheme
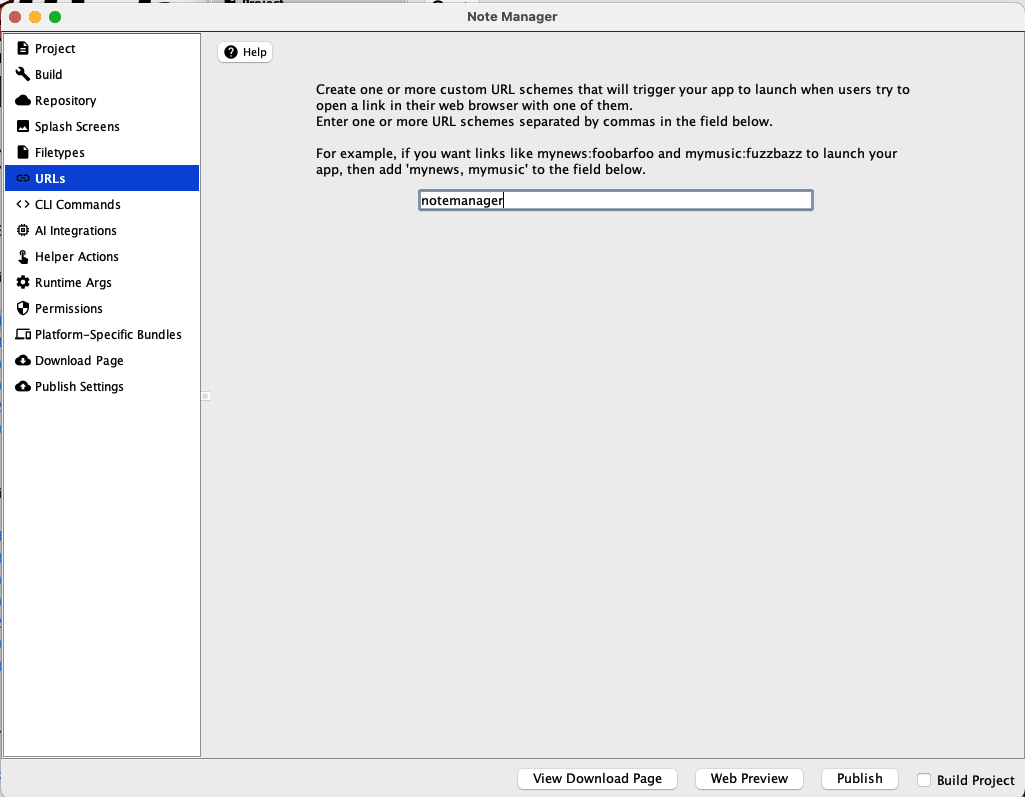
Click URLs in the side navigation and add notemanager as a URL scheme.
Verify the MCP Server Configuration
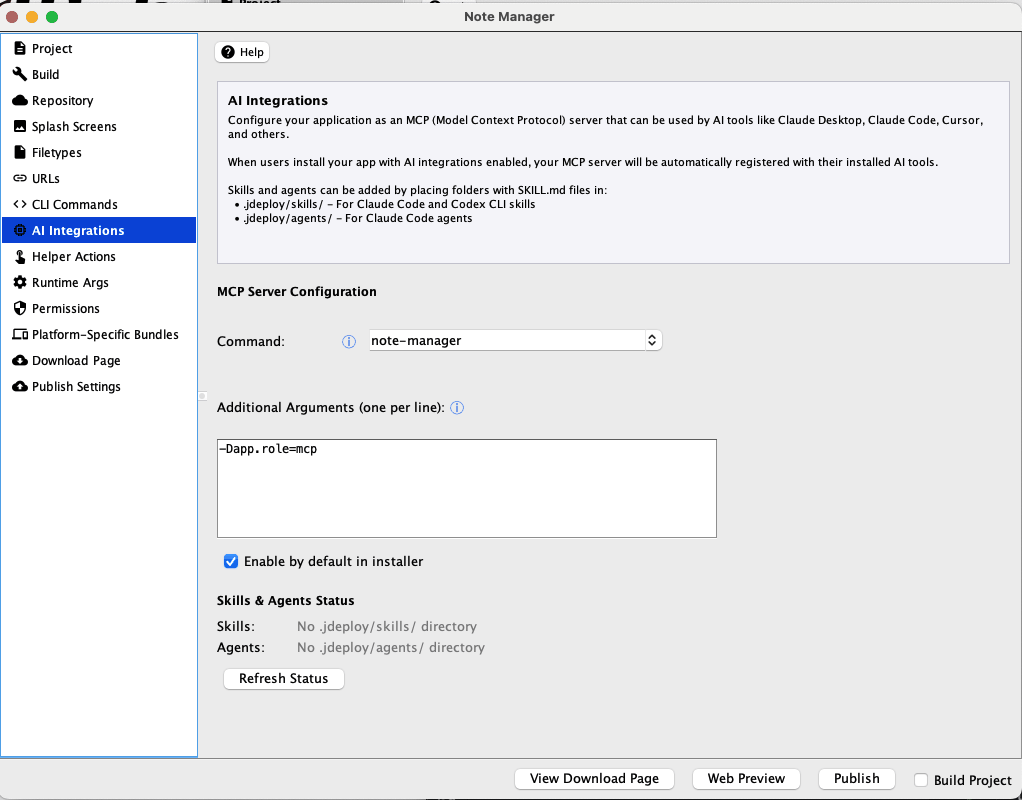
Click AI Integrations in the side navigation. The template already has the note-manager command selected as the MCP server. No additional configuration is needed.
The relevant parts of the resulting package.json should look like this:
{
  "name": "note-manager",
  "version": "1.0.0",
  "jdeploy": {
    "javaVersion": "21",
    "jar": "build/note-manager-1.0.0-SNAPSHOT-runner.jar",
    "title": "Note Manager",
    "javafx": true,
    "singleton": true,
    "urlSchemes": ["notemanager"],
    "commands": {
      "note-manager": {
        "description": "Note Manager MCP server"
      }
    },
    "ai": {
      "mcp": {
        "command": "note-manager"
      }
    }
  }
}
Here’s what each piece does:
-
javafx: true— Bundles JavaFX with the application for cross-platform GUI support. -
singleton: true— Only one GUI instance runs at a time. Subsequent launches forward their arguments to the existing instance. -
urlSchemes: ["notemanager"]— Registers thenotemanager://custom URL scheme with the OS. Deep links using this scheme are routed to the running app. -
commands.note-manager— The CLI command generated by the template. We use it as the MCP server command. -
ai.mcp— Configures the MCP server. Thecommandspecifies which CLI command to use as the MCP server.
Step 6: Update the Entry Point
The generated NoteManager.java already has mode detection for GUI vs. command mode. We need to modify it to launch JavaFX instead of Swing, initialize the GUI Bridge, and route MCP mode through Quarkus:
package com.example.notemanager;

import ca.weblite.jdeploy.app.hive.filewatcher.FileWatcherHiveDriver;
import io.quarkus.runtime.Quarkus;
import io.quarkus.runtime.annotations.QuarkusMain;

@QuarkusMain
public class NoteManager {

    public static final String MODE_GUI = "gui";
    public static final String MODE_COMMAND = "command";
    public static final String PROP_MODE = "jdeploy.mode";

    private static final String APP_NAME = "note-manager";

    public static void main(String... args) {
        // Ensure jdeploy.app.name is set (required by the bridge library)
        if (System.getProperty("jdeploy.app.name") == null) {
            System.setProperty("jdeploy.app.name", APP_NAME);
        }

        // Initialize background IPC for the GUI Bridge
        FileWatcherHiveDriver.install();

        String mode = System.getProperty(PROP_MODE, MODE_GUI);

        if (MODE_COMMAND.equalsIgnoreCase(mode)) {
            // MCP server mode: Quarkus handles stdin/stdout MCP protocol
            Quarkus.run(args);
        } else {
            // GUI mode: launch the JavaFX application
            NoteManagerApp.main(args);
        }
    }
}
The FileWatcherHiveDriver.install() call initializes the background IPC used by the GUI Bridge. This must be called in both modes (GUI and MCP server) so they can communicate with each other.
Building the JavaFX Note Manager
The Data Model
First, a simple model for our notes:
package com.example.notemanager.model;

import java.time.LocalDateTime;
import java.util.UUID;

public class Note {
    private final String id;
    private String title;
    private String content;
    private final LocalDateTime createdAt;
    private LocalDateTime modifiedAt;

    public Note(String title, String content) {
        this.id = UUID.randomUUID().toString().substring(0, 8);
        this.title = title;
        this.content = content;
        this.createdAt = LocalDateTime.now();
        this.modifiedAt = this.createdAt;
    }

    public String getId() { return id; }
    public String getTitle() { return title; }
    public void setTitle(String title) {
        this.title = title;
        this.modifiedAt = LocalDateTime.now();
    }
    public String getContent() { return content; }
    public void setContent(String content) {
        this.content = content;
        this.modifiedAt = LocalDateTime.now();
    }
    public LocalDateTime getCreatedAt() { return createdAt; }
    public LocalDateTime getModifiedAt() { return modifiedAt; }
}
The Note Store
A shared store that both the GUI and IPC handler can access:
package com.example.notemanager.model;

import java.util.ArrayList;
import java.util.List;
import java.util.Optional;
import java.util.stream.Collectors;

public class NoteStore {
    private static final NoteStore INSTANCE = new NoteStore();
    private final List<Note> notes = new ArrayList<>();

    public static NoteStore getInstance() { return INSTANCE; }

    private NoteStore() {
        // Start with a sample note
        notes.add(new Note("Welcome", "Welcome to Note Manager! "
            + "This app can be scripted by AI agents via MCP."));
    }

    public synchronized List<Note> getAllNotes() {
        return new ArrayList<>(notes);
    }

    public synchronized Optional<Note> getNote(String id) {
        return notes.stream()
            .filter(n -> n.getId().equals(id))
            .findFirst();
    }

    public synchronized Note createNote(String title, String content) {
        Note note = new Note(title, content);
        notes.add(note);
        return note;
    }

    public synchronized boolean deleteNote(String id) {
        return notes.removeIf(n -> n.getId().equals(id));
    }

    public synchronized List<Note> search(String query) {
        String lower = query.toLowerCase();
        return notes.stream()
            .filter(n -> n.getTitle().toLowerCase().contains(lower)
                || n.getContent().toLowerCase().contains(lower))
            .collect(Collectors.toList());
    }
}
The JavaFX Application
package com.example.notemanager;

import ca.weblite.jdeploy.app.JDeployOpenHandler;
import ca.weblite.jdeploy.app.bridge.GuiBridgeHandler;
import ca.weblite.jdeploy.app.bridge.GuiBridgeReceiver;
import ca.weblite.jdeploy.app.javafx.JDeployFXApp;
import com.example.notemanager.model.Note;
import com.example.notemanager.model.NoteStore;
import javafx.application.Application;
import javafx.application.Platform;
import javafx.collections.FXCollections;
import javafx.collections.ObservableList;
import javafx.geometry.Insets;
import javafx.geometry.Orientation;
import javafx.scene.Scene;
import javafx.scene.control.*;
import javafx.scene.layout.*;
import javafx.stage.Stage;

import java.io.File;
import java.io.IOException;
import java.net.URI;
import java.nio.file.Files;
import java.nio.file.Path;
import java.util.HashMap;
import java.util.List;
import java.util.Map;

public class NoteManagerApp extends Application {
    private Stage primaryStage;
    private ListView<Note> noteListView;
    private ObservableList<Note> noteItems;
    private TextArea contentArea;
    private TextField titleField;
    private TextField searchField;
    private final NoteStore store = NoteStore.getInstance();

    private GuiBridgeReceiver bridgeReceiver;

    public static void main(String[] args) {
        // IMPORTANT: Initialize JDeployFXApp before launching JavaFX.
        // On macOS, this registers AWT Desktop handlers while AWT is still
        // the primary toolkit. Without this, deep links won't be received.
        JDeployFXApp.initialize();
        launch(args);
    }

    @Override
    public void start(Stage stage) {
        this.primaryStage = stage;

        // --- Sidebar: note list + search + new button ---
        searchField = new TextField();
        searchField.setPromptText("Search notes...");
        searchField.textProperty().addListener((obs, oldVal, newVal) -> refreshList());

        noteItems = FXCollections.observableArrayList(store.getAllNotes());
        noteListView = new ListView<>(noteItems);
        noteListView.setCellFactory(lv -> new ListCell<>() {
            @Override
            protected void updateItem(Note note, boolean empty) {
                super.updateItem(note, empty);
                setText(empty || note == null ? null : note.getTitle());
            }
        });
        noteListView.getSelectionModel().selectedItemProperty()
            .addListener((obs, oldNote, newNote) -> showNote(newNote));

        Button newButton = new Button("New Note");
        newButton.setMaxWidth(Double.MAX_VALUE);
        newButton.setOnAction(e -> createNewNote());

        VBox sidebar = new VBox(8, searchField, noteListView, newButton);
        sidebar.setPadding(new Insets(10));
        sidebar.setPrefWidth(250);
        VBox.setVgrow(noteListView, Priority.ALWAYS);

        // --- Editor: title + content ---
        titleField = new TextField();
        titleField.setPromptText("Note title");
        titleField.setStyle("-fx-font-size: 16px; -fx-font-weight: bold;");
        titleField.textProperty().addListener((obs, oldVal, newVal) -> {
            Note selected = noteListView.getSelectionModel().getSelectedItem();
            if (selected != null) {
                selected.setTitle(newVal);
                noteListView.refresh();
            }
        });

        contentArea = new TextArea();
        contentArea.setPromptText("Start writing...");
        contentArea.setWrapText(true);
        contentArea.textProperty().addListener((obs, oldVal, newVal) -> {
            Note selected = noteListView.getSelectionModel().getSelectedItem();
            if (selected != null) {
                selected.setContent(newVal);
            }
        });

        VBox editor = new VBox(8, titleField, contentArea);
        editor.setPadding(new Insets(10));
        VBox.setVgrow(contentArea, Priority.ALWAYS);

        // --- Layout ---
        SplitPane root = new SplitPane(sidebar, editor);
        root.setOrientation(Orientation.HORIZONTAL);
        root.setDividerPositions(0.3);

        Scene scene = new Scene(root, 900, 600);
        stage.setTitle("Note Manager");
        stage.setScene(scene);

        // Set up MCP command handling via GuiBridge
        setupBridgeReceiver();

        // Register deep link handler (for "show_note" and fallback)
        registerDeepLinkHandler();

        stage.show();

        // Select first note
        if (!noteItems.isEmpty()) {
            noteListView.getSelectionModel().select(0);
        }
    }

    // =========================================================================
    // GUI BRIDGE SETUP
    // =========================================================================

    private void setupBridgeReceiver() {
        // Create handler that processes MCP commands
        GuiBridgeHandler handler = this::handleCommand;

        // Create receiver and register for background commands
        bridgeReceiver = new GuiBridgeReceiver(handler);
        bridgeReceiver.registerHiveListener(requestPath ->
                Platform.runLater(() -> bridgeReceiver.processRequest(requestPath)));
    }

    private Map<String, String> handleCommand(String command, Map<String, String> params) {
        return switch (command) {
            case "list_notes" -> {
                Map<String, String> result = new HashMap<>();
                List<Note> notes = store.getAllNotes();
                result.put("count", String.valueOf(notes.size()));
                int i = 0;
                for (Note n : notes) {
                    result.put("note." + i + ".id", n.getId());
                    result.put("note." + i + ".title", n.getTitle());
                    result.put("note." + i + ".createdAt", n.getCreatedAt().toString());
                    result.put("note." + i + ".modifiedAt", n.getModifiedAt().toString());
                    i++;
                }
                yield result;
            }

            case "get_note" -> {
                String noteId = params.get("id");
                Note note = store.getNote(noteId)
                        .orElseThrow(() -> new RuntimeException("Note not found: " + noteId));
                yield Map.of(
                        "id", note.getId(),
                        "title", note.getTitle(),
                        "content", note.getContent(),
                        "createdAt", note.getCreatedAt().toString(),
                        "modifiedAt", note.getModifiedAt().toString()
                );
            }

            case "create_note" -> {
                String title = params.get("title");
                String content = params.getOrDefault("content", "");
                Note note = store.createNote(title, content);
                refreshList();
                yield Map.of(
                        "id", note.getId(),
                        "title", note.getTitle(),
                        "createdAt", note.getCreatedAt().toString(),
                        "modifiedAt", note.getModifiedAt().toString()
                );
            }

            case "search_notes" -> {
                String query = params.get("query");
                Map<String, String> result = new HashMap<>();
                List<Note> notes = store.search(query);
                result.put("count", String.valueOf(notes.size()));
                int i = 0;
                for (Note n : notes) {
                    result.put("note." + i + ".id", n.getId());
                    result.put("note." + i + ".title", n.getTitle());
                    i++;
                }
                yield result;
            }

            case "show_note" -> {
                String noteId = params.get("id");
                navigateToNote(noteId);
                yield Map.of("shown", "true");
            }

            case "export_note" -> {
                String noteId = params.get("id");
                String outputPath = params.get("path");
                Note note = store.getNote(noteId)
                        .orElseThrow(() -> new RuntimeException("Note not found: " + noteId));
                try {
                    Files.writeString(Path.of(outputPath),
                            "# " + note.getTitle() + "\n\n" + note.getContent());
                } catch (IOException e) {
                    throw new RuntimeException("Failed to export: " + e.getMessage());
                }
                yield Map.of("exported", "true", "path", outputPath);
            }

            default -> throw new IllegalArgumentException("Unknown command: " + command);
        };
    }

    // =========================================================================
    // DEEP LINK HANDLER
    // =========================================================================

    private void registerDeepLinkHandler() {
        JDeployFXApp.setOpenHandler(new JDeployOpenHandler() {
            @Override
            public void openFiles(List<File> files) {
                // Not used in this tutorial
            }

            @Override
            public void openURIs(List<URI> uris) {
                for (URI uri : uris) {
                    if ("notemanager".equals(uri.getScheme()) && "bridge".equals(uri.getHost())) {
                        // Process via bridge receiver
                        bridgeReceiver.processDeepLink(uri);
                    }
                }
            }

            @Override
            public void appActivated() {
                primaryStage.setIconified(false);
                primaryStage.toFront();
                primaryStage.requestFocus();
            }
        });
    }

    // =========================================================================
    // NOTE DISPLAY
    // =========================================================================

    private void showNote(Note note) {
        if (note == null) {
            titleField.clear();
            contentArea.clear();
            return;
        }
        titleField.setText(note.getTitle());
        contentArea.setText(note.getContent());
    }

    private void createNewNote() {
        Note note = store.createNote("Untitled", "");
        refreshList();
        noteListView.getSelectionModel().select(note);
        titleField.requestFocus();
        titleField.selectAll();
    }

    public void refreshList() {
        String query = searchField.getText();
        List<Note> filtered = (query == null || query.isBlank())
            ? store.getAllNotes()
            : store.search(query);
        noteItems.setAll(filtered);
    }

    public void navigateToNote(String noteId) {
        store.getNote(noteId).ifPresent(note -> {
            searchField.clear();
            refreshList();
            noteListView.getSelectionModel().select(note);
            noteListView.scrollTo(note);
            primaryStage.setIconified(false);
            primaryStage.toFront();
            primaryStage.requestFocus();
        });
    }
}
Notice how the handleCommand method contains all the business logic for MCP commands. The GuiBridgeReceiver handles all the IPC details — reading request files, parsing parameters, and writing responses.
The GUI Bridge Library
The jdeploy-desktop-lib-bridge module handles all the complexity of MCP-to-GUI communication. You don’t need to write any IPC code yourself — just use the provided GuiBridge (sender side) and GuiBridgeReceiver (receiver side).
The bridge provides two methods for sending commands:
-
sendCommand()— Sends a command in the background. The GUI processes it without coming to the foreground. Use this for data queries. -
sendCommandViaDeepLink()— Sends a command and brings the GUI to the foreground. Use this for commands likeshow_notethat should display something to the user.
Setting Up the Receiver (GUI Side)
In the JavaFX application, create a GuiBridgeReceiver with a handler that processes commands:
// Create handler that processes MCP commands
GuiBridgeHandler handler = this::handleCommand;

// Create receiver and register for background commands
GuiBridgeReceiver bridgeReceiver = new GuiBridgeReceiver(handler);
bridgeReceiver.registerHiveListener(requestPath ->
        Platform.runLater(() -> bridgeReceiver.processRequest(requestPath)));
The handler is a simple method that takes a command name and parameters, and returns a result map:
private Map<String, String> handleCommand(String command, Map<String, String> params) {
    return switch (command) {
        case "list_notes" -> {
            Map<String, String> result = new HashMap<>();
            List<Note> notes = store.getAllNotes();
            result.put("count", String.valueOf(notes.size()));
            int i = 0;
            for (Note n : notes) {
                result.put("note." + i + ".id", n.getId());
                result.put("note." + i + ".title", n.getTitle());
                i++;
            }
            yield result;
        }
        case "create_note" -> {
            Note note = store.createNote(params.get("title"), params.getOrDefault("content", ""));
            refreshList();
            yield Map.of("id", note.getId(), "title", note.getTitle());
        }
        // ... other commands
        default -> throw new IllegalArgumentException("Unknown command: " + command);
    };
}
Building the MCP Server (Quarkus)
The MCP server is the CLI-side process. It runs under Quarkus with the quarkus-mcp-server-stdio extension, which handles the MCP protocol over stdin/stdout. Each @Tool-annotated method becomes a tool that AI agents can call.
MCP Tool Definitions
The MCP tools use GuiBridge from the library to communicate with the GUI. The bridge handles all IPC complexity — you just call sendCommand() or sendCommandViaDeepLink():
package com.example.notemanager.mcp;

import ca.weblite.jdeploy.app.bridge.GuiBridge;
import io.quarkiverse.mcp.server.Tool;
import io.quarkiverse.mcp.server.ToolArg;

import java.util.Map;

public class NoteManagerTools {

    // GuiBridge handles all IPC with the GUI
    private static final GuiBridge bridge = new GuiBridge("notemanager");

    @Tool(description = "List all notes in the Note Manager. "
            + "Returns note IDs, titles, and timestamps.")
    public String listNotes() throws Exception {
        Map<String, String> result = bridge.sendCommand("list_notes", Map.of());
        return formatResult(result);
    }

    @Tool(description = "Get the full content of a note by its ID.")
    public String getNote(
            @ToolArg(description = "The note ID") String id) throws Exception {
        Map<String, String> result = bridge.sendCommand("get_note", Map.of("id", id));
        return formatResult(result);
    }

    @Tool(description = "Create a new note with the given title and content.")
    public String createNote(
            @ToolArg(description = "The note title") String title,
            @ToolArg(description = "The note content") String content) throws Exception {
        Map<String, String> result = bridge.sendCommand("create_note",
                Map.of("title", title, "content", content));
        return formatResult(result);
    }

    @Tool(description = "Search notes by keyword. Searches both titles and content.")
    public String searchNotes(
            @ToolArg(description = "The search query") String query) throws Exception {
        Map<String, String> result = bridge.sendCommand("search_notes", Map.of("query", query));
        return formatResult(result);
    }

    @Tool(description = "Navigate the Note Manager GUI to display a specific note. "
            + "Brings the window to the front.")
    public String showNote(
            @ToolArg(description = "The note ID to display") String id) throws Exception {
        // Use deep link because this command should bring the app to the foreground
        Map<String, String> result = bridge.sendCommandViaDeepLink("show_note", Map.of("id", id));
        return formatResult(result);
    }

    @Tool(description = "Export a note to a file. The note is written as Markdown.")
    public String exportNote(
            @ToolArg(description = "The note ID to export") String id,
            @ToolArg(description = "The file path to write to") String path) throws Exception {
        Map<String, String> result = bridge.sendCommand("export_note",
                Map.of("id", id, "path", path));
        return formatResult(result);
    }

    private static String formatResult(Map<String, String> result) {
        StringBuilder sb = new StringBuilder("{");
        boolean first = true;
        for (Map.Entry<String, String> entry : result.entrySet()) {
            if (!first) sb.append(", ");
            first = false;
            sb.append("\"").append(entry.getKey()).append("\": ");
            sb.append("\"").append(escapeJson(entry.getValue())).append("\"");
        }
        sb.append("}");
        return sb.toString();
    }

    private static String escapeJson(String s) {
        if (s == null) return "";
        return s.replace("\\", "\\\\")
                .replace("\"", "\\\"")
                .replace("\n", "\\n")
                .replace("\r", "\\r")
                .replace("\t", "\\t");
    }
}
Key points:
-
sendCommand()processes in the background — the GUI stays in the background while processing data queries -
sendCommandViaDeepLink()brings the GUI to the foreground — used forshow_notewhich should display something to the user -
The bridge automatically falls back to deep links if the GUI isn’t running
Each tool returns a JSON string that the AI agent can parse. The tool descriptions are important — they tell the AI agent what each tool does and when to use it, just as an AppleScript dictionary describes an application’s commands.
Final Project Structure
After adding all the code, your project structure should look like this:
note-manager/
├── .github/
│   └── workflows/
│       └── jdeploy.yml
├── src/
│   └── main/
│       ├── java/
│       │   └── com/example/notemanager/
│       │       ├── NoteManager.java       # Entry point
│       │       ├── NoteManagerApp.java    # JavaFX GUI
│       │       ├── model/
│       │       │   ├── Note.java          # Note data model
│       │       │   └── NoteStore.java     # In-memory store
│       │       └── mcp/
│       │           └── NoteManagerTools.java  # MCP tool definitions
│       └── resources/
│           └── application.properties
├── build.gradle
├── package.json
└── ...
Trying It Out
Local Testing
For local development and testing, you can build and install directly without publishing:
./gradlew buildUberJar
jdeploy install
This installs the app locally, adds the MCP command to your PATH, and configures the MCP server in your AI tools.
Using It with an AI Agent
Launch the Note Manager GUI, then open your AI tool. The MCP tools are automatically available. Try conversations like:
Create a note called "Meeting Notes" with the content
"Discuss Q4 budget, review hiring pipeline, plan offsite."
Search my notes for "budget"
Show me the Meeting Notes note in the app.
Export all notes about "project" to ~/Desktop/notes/
The AI agent calls the MCP tools, which communicate with the running GUI, and the GUI responds with structured data. The AI never needs to see the screen or simulate clicks — it works with the application’s semantic API.
Publishing to GitHub
The Quarkus MCP Server template includes a GitHub Actions workflow (.github/workflows/jdeploy.yml) that automatically builds native app installer bundles when you create a release. This means your users can download and install the Note Manager — complete with MCP server integration — from your GitHub releases page.
Step 1: Push to GitHub
Initialize a Git repository (if you haven’t already) and push your project to the GitHub repository you specified during project creation:
cd note-manager
git init
git add .
git commit -m "Initial commit: Note Manager with MCP support"
git remote add origin https://github.com/yourusername/note-manager.git
git push -u origin master
Step 2: Verify the Build
Before creating a release, verify that your project builds locally:
./gradlew buildUberJarThis should produce build/note-manager-1.0.0-SNAPSHOT-runner.jar.
Step 3: Create a Release
The GitHub Actions workflow is triggered when you push a tag that starts with v. Create and push a tag for your first release:
git tag v1.0.0
git push origin v1.0.0
Alternatively, you can create the release through the GitHub web UI:
-
Go to your repository on GitHub
-
Click Releases in the right sidebar
-
Click Create a new release
-
Enter
v1.0.0as the tag (select "Create new tag on publish") -
Enter a release title (e.g., "Note Manager 1.0.0")
-
Click Publish release

Step 4: Wait for the Build
The GitHub Actions workflow will automatically:
-
Check out your code
-
Set up JDK 21
-
Build the uber-jar with Gradle
-
Run the jDeploy action to build native installer bundles for Windows, macOS, and Linux
-
Attach the installer bundles to the GitHub release
You can monitor the build progress in the Actions tab of your repository.

Step 5: Download and Install
Once the workflow completes, the release page will have installer downloads for each platform. Users can download the appropriate installer for their OS and run it.

During installation, the jDeploy installer will:
-
Install the Note Manager GUI application
-
Add the
note-manager-mcpcommand to the user’s PATH -
Detect installed AI tools and offer to configure the MCP server

Alternative Approaches
The deep linking approach is natural for jDeploy apps because it uses infrastructure that jDeploy already provides. But it’s worth knowing the alternatives and their trade-offs.
Embedded HTTP Server in the GUI
Instead of deep links, the JavaFX app could start an embedded HTTP server (using Javalin, com.sun.net.httpserver, or similar) and the MCP server could make HTTP calls to it.
Drawbacks:
-
Security surface — Opens a network port on the user’s machine. Corporate firewalls and endpoint security tools may flag or block it.
-
Port conflicts — Need to handle the case where the chosen port is already in use.
-
Additional dependencies — Requires an HTTP server library in the GUI app.
-
No wake-up mechanism — If the GUI isn’t running, the MCP server has no way to start it. You’d need to add deep linking anyway for that.
-
Doesn’t leverage jDeploy — Ignores the IPC infrastructure that jDeploy already provides.
Raw Socket or Unix Domain Socket
The GUI app listens on a socket; the MCP server connects to it.
Drawbacks:
-
Platform-specific behavior — Unix domain sockets aren’t available on older Windows versions. TCP sockets have the same port/firewall issues as HTTP.
-
Custom protocol — You need to design and implement a wire protocol, handle framing, buffering, and error recovery.
-
Harder to debug — Can’t inspect traffic with standard tools the way you can with HTTP or JSON files.
-
No wake-up mechanism — Same as HTTP: no way to launch the GUI if it’s not running.
Vision-Based Automation (Computer Use)
AI agents like Anthropic’s Computer Use can screenshot the desktop and simulate mouse/keyboard input to control any application.
Drawbacks:
-
Fragile — Breaks when the UI changes: different theme, font size, screen resolution, or OS version.
-
Slow — Each interaction requires a screenshot, a vision model inference, and simulated input. A single tool call can take seconds.
-
Blind to hidden state — Can only see what’s on screen. Can’t query notes that are scrolled out of view, count items in a list, or access data that isn’t currently rendered.
-
No structured data — Returns pixels, not JSON. The AI must OCR the screen to extract text, with all the errors that implies.
-
Expensive — Vision model calls per interaction add up quickly.
File Watcher Without Deep Linking
The GUI app watches a directory for command files using java.nio.file.WatchService.
Drawbacks:
-
No wake-up — If the GUI isn’t running, commands sit in the directory with no one listening.
-
Polling latency —
WatchServicelatency varies by OS (up to 10 seconds on some platforms). -
No guaranteed delivery — If the GUI crashes between detecting a file and processing it, the command is lost.
Our Approach: The GUI Bridge Library
The jdeploy-desktop-lib-bridge module avoids all these drawbacks:
-
Background processing — Data queries don’t interrupt the user or steal focus
-
Automatic wake-up — If the GUI isn’t running, it’s launched automatically
-
Foreground when needed — Commands like
show_notebring the GUI to front
The bridge library handles all this automatically. Call sendCommand() for background operations and sendCommandViaDeepLink() when you want to bring the GUI to front.
|
Summary
In this tutorial we built a JavaFX Note Manager application that is fully scriptable by AI agents via MCP. The key components:
-
jDeploy multi-modal packaging — A single
package.jsondeclares both the GUI app and the MCP server command -
GUI Bridge library — The
jdeploy-desktop-lib-bridgemodule handles all IPC complexity withGuiBridge(sender) andGuiBridgeReceiver(receiver) -
Background and foreground modes — Data queries stay in the background; UI commands bring the app to front
-
Singleton mode — Ensures commands route to the running instance
-
Quarkus MCP tools — Six
@Tool-annotated methods that AI agents discover automatically -
Semantic commands — Tools that expose what the app can do, not how to click its UI
The library-based approach means you don’t need to write any IPC code yourself. Just implement a command handler in your GUI and use GuiBridge in your MCP tools.
The pattern is reusable. Any JavaFX application deployed with jDeploy can adopt this approach to become scriptable by AI agents — bringing the power of AppleScript-style automation to the cross-platform Java desktop, powered by MCP.
See Also
-
jDeploy 6.0 Release Notes for multi-modal app support and MCP server configuration
-
Deep Linking into a JavaFX Application for the deep linking tutorial
-
MCP Server and AI Tool Integration in the release notes
-
Introducing MCP Servers on the Quarkus blog
-
Model Context Protocol specification